
This article explains how to create a report using a button on the Manage Worklogs Reports page, where you can also view all reports accessible to your account.
Why should you use this page?
You can use the Manage Worklogs Reports page to create reports. This method is useful when you need full control over a report’s source during creation, compared to modifying an existing report and saving it as a copy.
You can also use this page to find reports you have permission to view and identify reports that share the same source or name.
How can you access this page to create a report?
You can create a Worklogs Report from the Manage Worklogs Reports page, which also lists all available reports, by following these steps:
-
In Jira’s sidebar, click Apps and select Worklogs.
-
In the loaded report, click the report name.
-
From the dropdown, select View all reports.
-
On the Manage Worklogs Reports page, click Create Report.
Alternatively, while viewing a report, click Save As in the top-right corner. You can then configure the new report by changing the space or filter, users and groups, and other settings.
You can create a Worklogs Report from the Manage Worklogs Reports page, which also lists all available reports, by following these steps:
-
From Jira top navigation bar, select Worklogs.
-
Within the loaded report, click on the report name.
-
With the dropdown, select View all reports.
-
On the Manage Worklogs Reports page, click Create Report.
Alternatively, while viewing a report, click Save As in the top-right corner. You can then configure the new report by changing the project or filter, users and groups, and other settings.
What can you define when creating a report?
After clicking Create Report on the Manage Worklogs Reports page, you can configure the following fields on the Create Worklogs Report page:
-
Name: Define a name for the report. You cannot save a report without a name.
-
Description: Add a description explaining the report’s purpose and intended audience.
-
Project or Filter: Select the report source as a single space, multiple spaces, or a saved filter.
-
Users: Specify which users are included in the worklogs. If left empty, the report includes worklogs from all users. You can also select a single user or a group of users.
-
Owner: Automatically set to the user who creates the report.
-
Admins: Define users who can manage sharing settings, update the report source, and modify other configurations. See the separate article for details on the difference between a report admin and a Jira admin.
-
Public: Define whether the report is accessible to all logged-in Jira users. Report sharing options are described in a separate article.
-
User Groups: Define groups that can access the report.
-
Users: Define individual users who can access the report.
Access to all users’ worklogs is also controlled at the app level, as explained in a related article.
How do you add users or groups to a report?
While creating a report, you can grant access to report admins, users, or user groups by following these steps:
-
On the Create Worklogs Report page, in the Sharing section, click the Admins, Users, or User Groups field to open the search dialog.
-
Use this dialogue to select for user or groups. The Admins and Users fields list all active users, while the User Groups field lists all available groups in your Jira instance.
-
To remove an admin, user, or group, click the X icon next to their name.
-
After you finish making changes on the Create Worklogs Report page, click Save.
Will you need to save the created report?
When you create a new report from the Manage Worklogs Reports page, it is automatically saved with a unique ID. Any subsequent changes are saved automatically.
Features and uses cases
FAQ
Troubleshooting
How can you verify if you've lost access to a report source?
-20260705-021733.png?cb=5371eade4ec6684f8cb144c384ffc1b9)
The error message above appears when the Project or Filter field references a filter that you do not have permission to access.
To troubleshoot this work item, contact the report owner, report admin, or Jira administrator to confirm who owns the filter and who can update its visibility permissions.
How can you verify if you can access all worklogs?
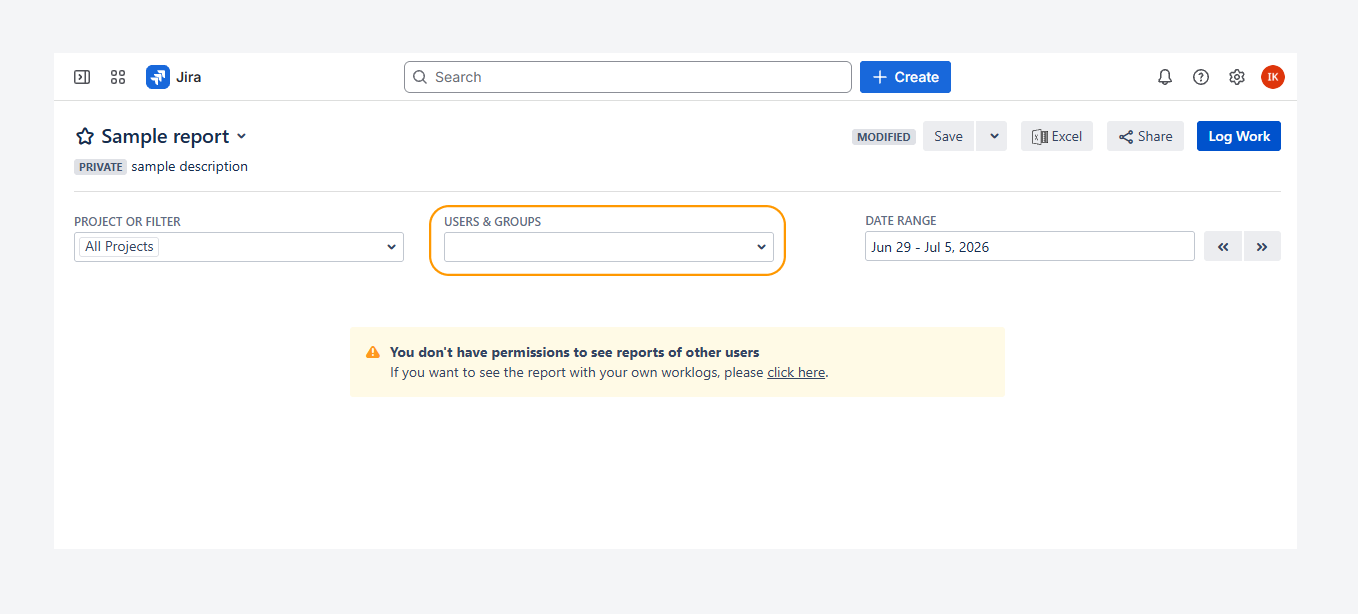
The error message above appears when the Users & Groups field is left blank and you do not have permission to access other users’ worklogs.
To restore access to all worklogs, follow the steps described in the related article.
How can you verify if you've lost access to the app?
-20260704-230434.png?cb=c37cd503d11d5829e075ee972247d438)
The error message above appears when you have lost access to the app and you are attempt to access the Manage Worklogs Reports page.
A Jira admin can prevent users from creating or accessing reports by removing their permission to use the app.
To revoke or restore access, follow the steps described in the related article.
Why can't you find the app inside a project's navigation?
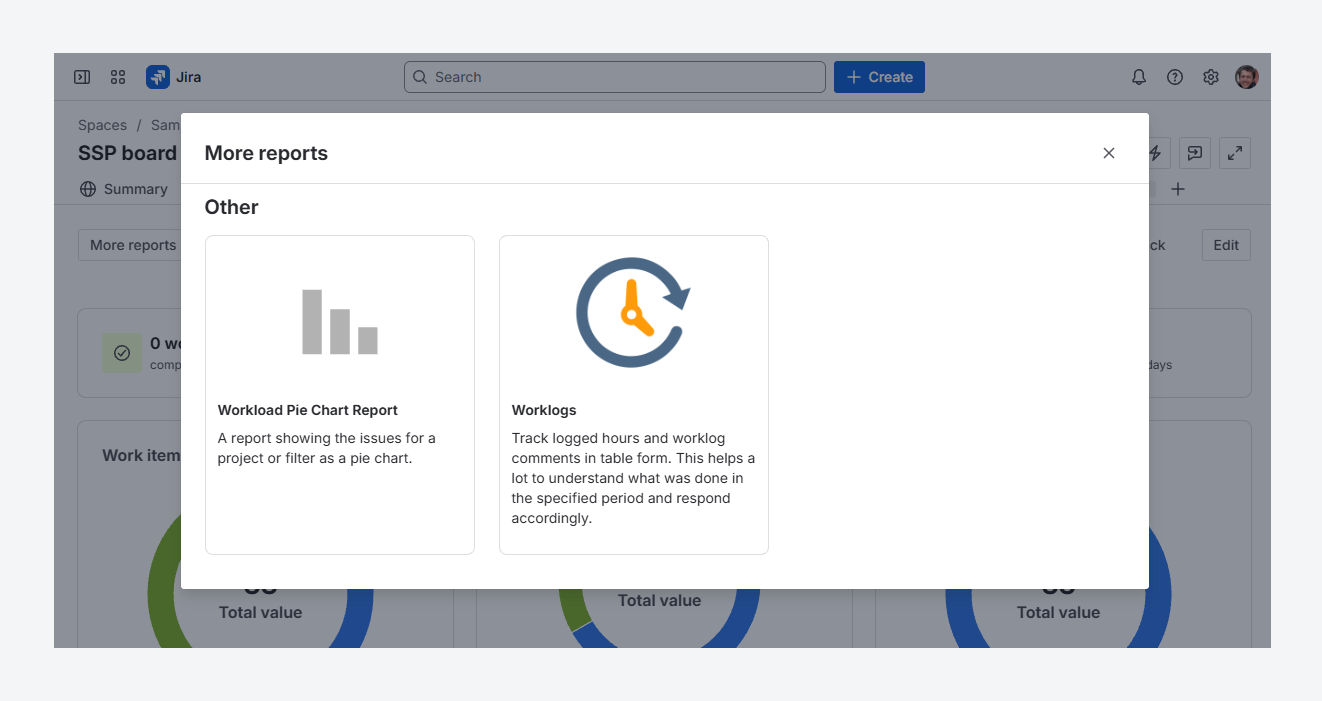
The screenshot above shows Worklogs Report alongside the other report options in a space's navigation on Jira Cloud.
If you see an error after following these steps, you have lost access to the app. Refer to the previous troubleshooting topic to restore access.
To avoid opening the app each time you need to find a report, create a shortcut that keeps the report in sync with a board or space by following the steps in a related article.
If you have questions or need assistance, contact our support team via email or service desk. Our team is available Monday through Friday (9:00 AM to 7:00 PM GMT+7) to help with technical challenges or discuss improvements.