
-20250813-233645.png?cb=03fe302d434dd8f41c309ed353615de7)
This article outlines the advantages of using widgets over the default Work item View features on Jira Cloud, and it provides configuration instructions within the FAQ.
A related article explains how to create a report with these widgets.
Why should you use widgets?
Widgets become available after the app is installed in your Jira Cloud instance.
Display the hierarchy without leaving the Work item view
Widgets give you a complete view of the work item hierarchy, unlike Jira’s default Work item View—especially for container work items like Epics.
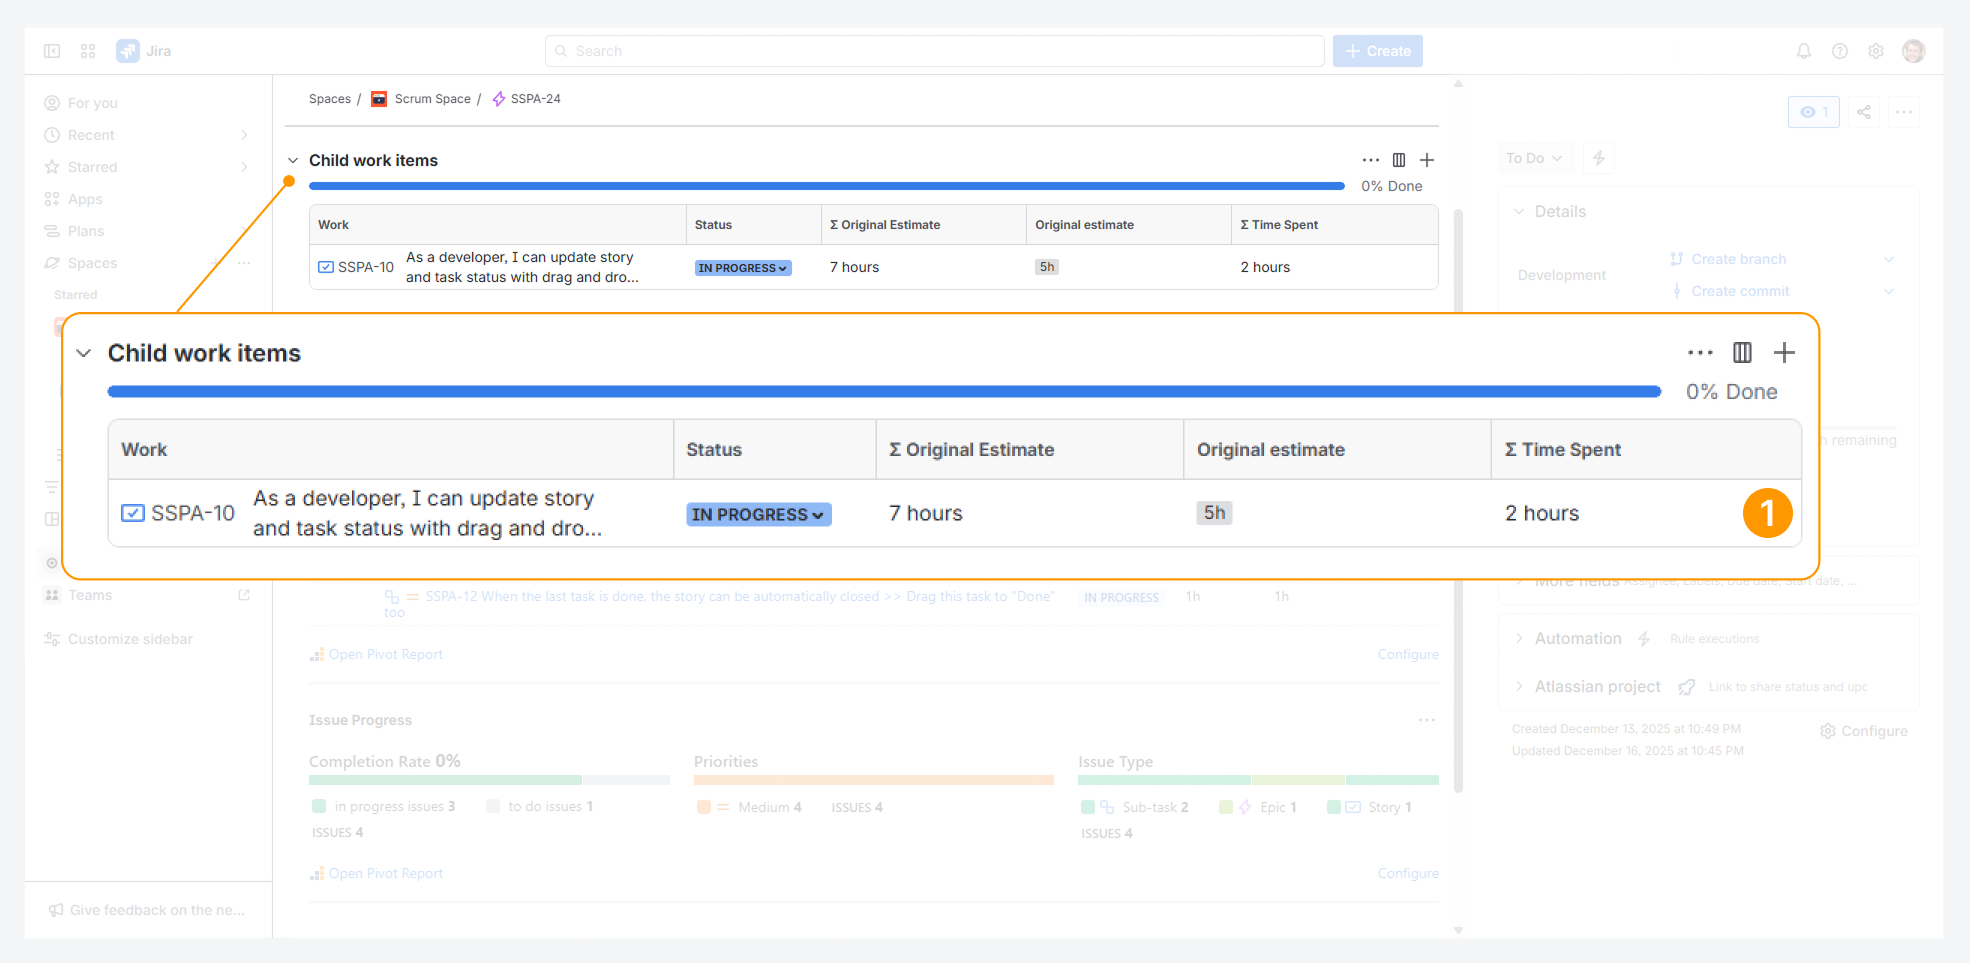
-
Jira’s table of child-level items shows only part of the hierarchy, leaving out sub-tasks.
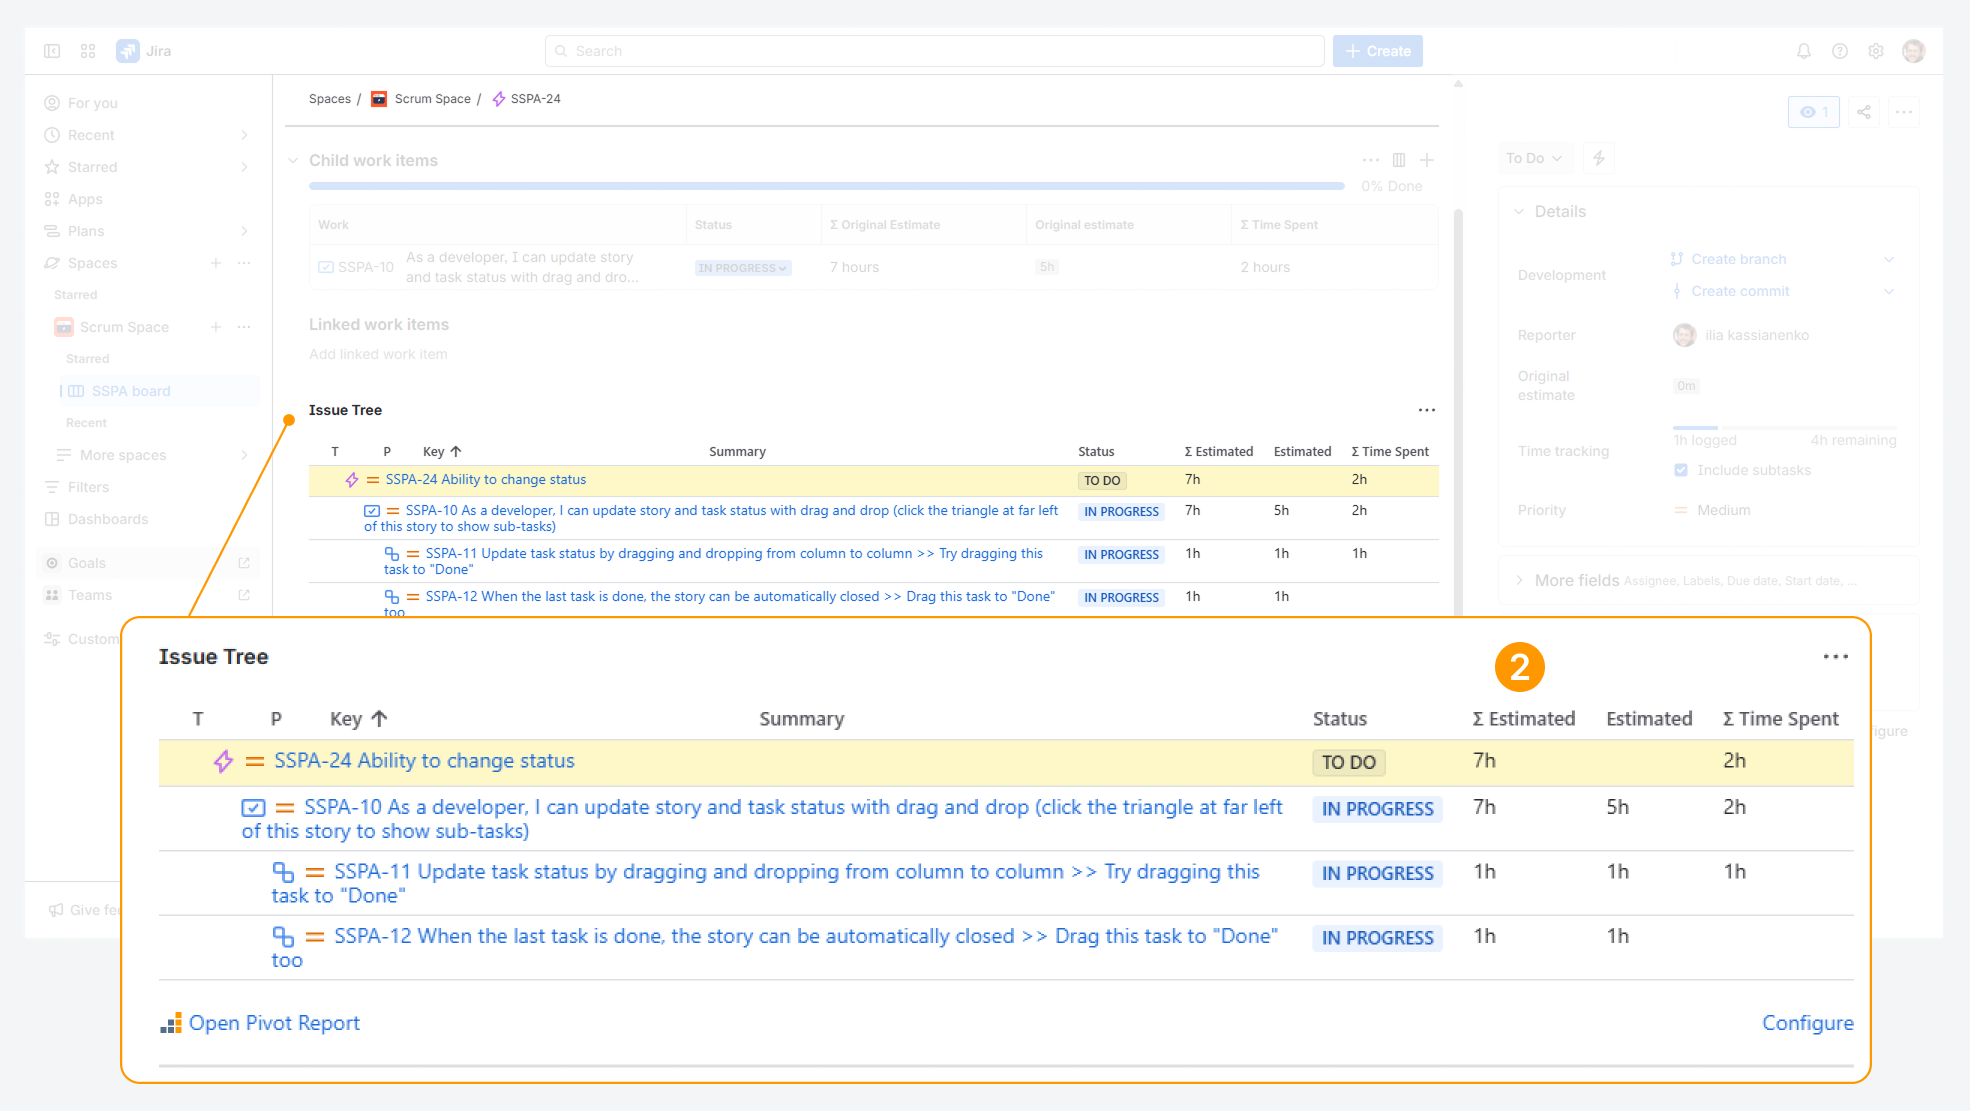
In addition to showing the full hierarchy, the Work Item Tree widget can be configured to display how each item contributes to the overall work.
-
This contribution can appear as numeric time-tracking values or as visual progress indicators—information that is not available in the default Work item view.
Measure how each work item contributes to your Space goals
Widgets provide a complete view of progress indicators.
-20260106-043501.png?cb=53b1bacfd5c4ec480cc5bc90d907c581)
-
Jira’s table of child-level items is limited to showing a completion rate based on status for only it’s child items, excluding sub-tasks.
-20260106-043854.png?cb=64296b371387f4efa522a706e6a08c17)
-
The Work Item Progress widget can display the completion rate and other progress indicators for all work items in the hierarchy, including sub-tasks.
Preview a report before creating it
Widgets give you the means to preview report contents (e.g. the Summary sections for the Progress and Work item Structure tabs) directly from the Work item view.
Features and use cases
Display a custom hierarchy within a widget
You can display multiple levels of a custom hierarchy in the Work Item Tree widget.
In the example shown, a newly created work type called Initiative is placed above an epic, allowing it to appear as the parent in the hierarchy.
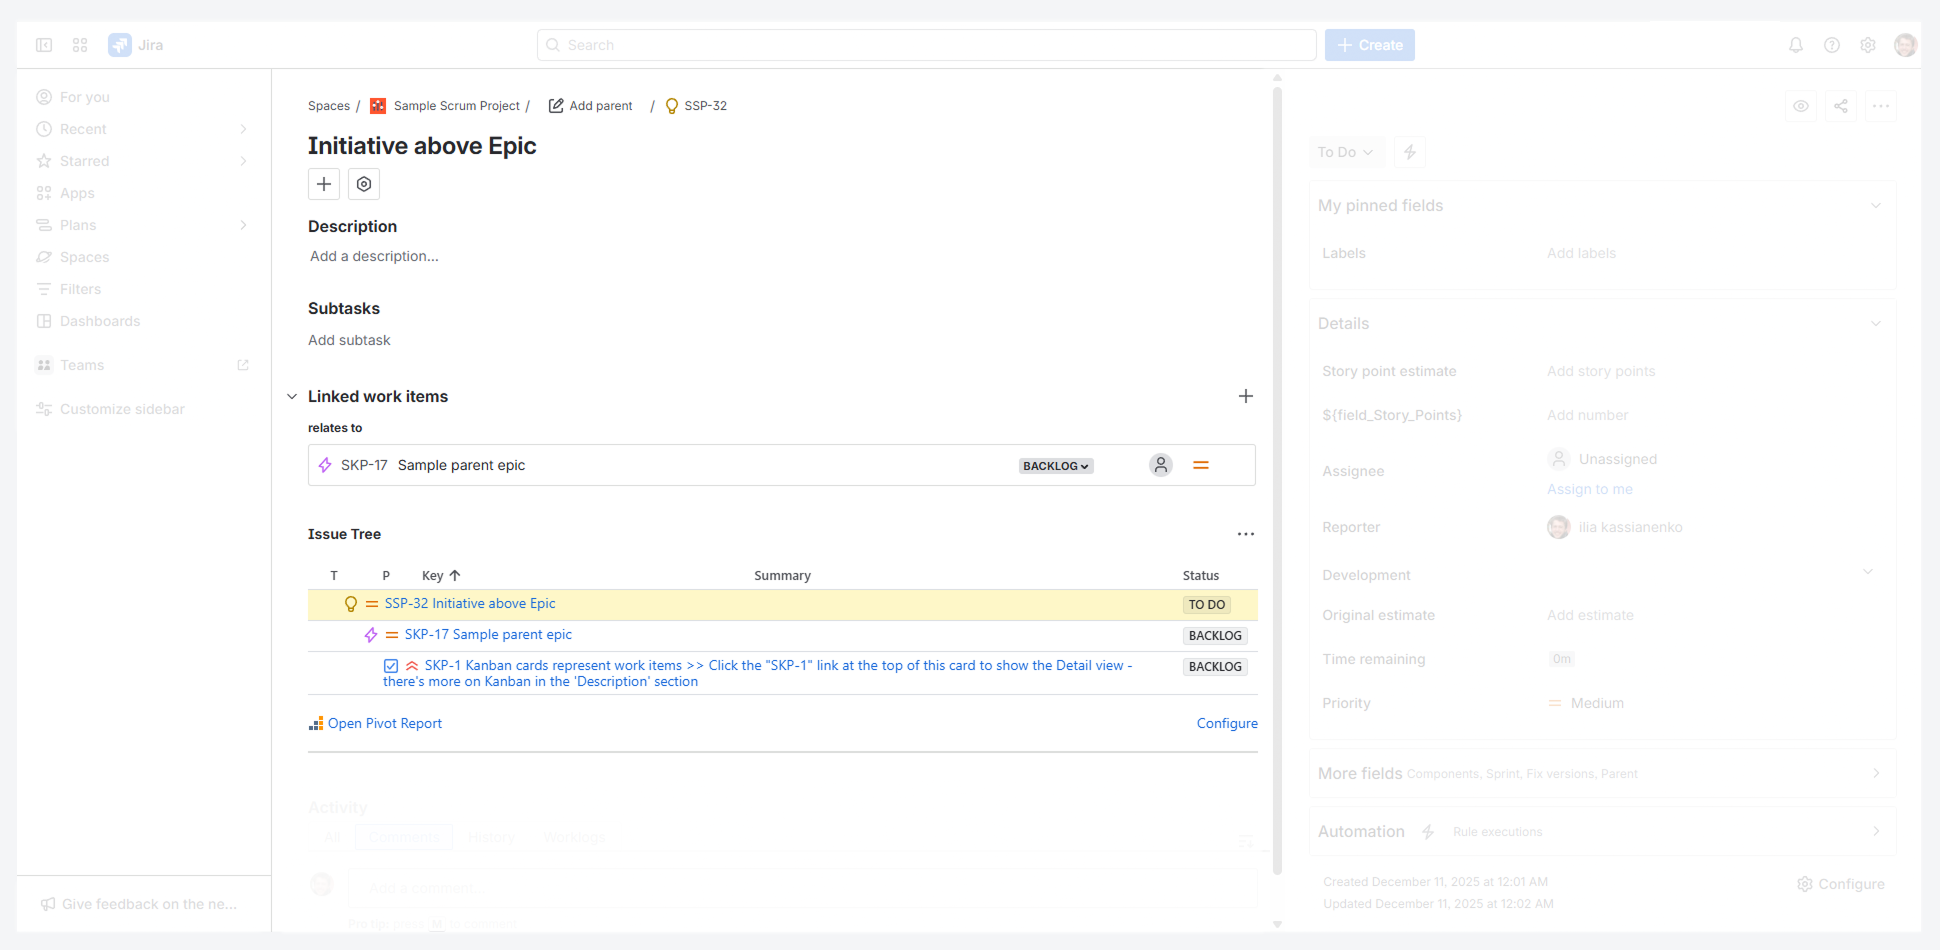
The steps for defining a custom hierarchy are outlined in a related article.
Override the default widget contents based on the Work type
You can override the default widget contents based on the work type. A Space admin or Jira admin can choose which details appear in each widget for all work types within a Space. If you want two Spaces to have different widget contents, repeat the steps below for each Space.
To update the widget appearance:
-
Select Configure on the Work Item Tree widget. Enable Override application settings, then choose the columns to display for each work type.
-
Select Configure on the Work Item Progress widget. Enable Override application settings, then choose the progress indicators to display for each work type.
-
Optionally, for each widget, uncheck Use default settings, then choose whether parent work items should include estimates from all items or only from their child items.
This setting affects progress indicators based on item counts, such as Completion Rate or Completed Work item Count.
-20250814-030316.png?cb=357d7b08b1579a2504e7c91cca0efa67)
The list of available progress indicators is available in a related article.
Configure Widgets at the Space and Work item Level
Jira admins and Space admins can configure widgets by:
-
Clicking Configure in the Work item Tree widget.
-
Clicking Configure in the Work item Progress widget.
The Configure link opens the Pivot Report Space Settings page, where you can adjust contents and permissions for either widget.
For example, you can change:
-
Whether to extend child, parent, and sibling items, based on the Work Type where the widget is added.
-
Which Jira or Colined field columns to display, based on the Work Type where the widget is added.
-
Whether to include estimates for all work items or only leaf work items, based on the Work Type where the widget is added.
-
Which progress indicators to display, based on the Work Type where the widget is added.
Define how leaf work items are used for progress indicators within widgets
A Jira admin can control how leaf work items are used for progress indicators in reports and widgets.
For example, if progress is tracked only at the sub-task level, stories and epics can be excluded from item counts. In this case, sub-tasks are treated as leaf items in the hierarchy.
To limit progress indicators to leaf work items or include all items, follow these steps:
-
Open the Settings menu in Jira’s top navigation bar, by clicking on the gear icon.
-
From the dropdown, choose Marketplace apps.
-
Under Pivot Report, click Settings.
-
On the Pivot Report Settings page, select the General tab.
-
In the Parent work items estimates section, select Leaf Work items Only.
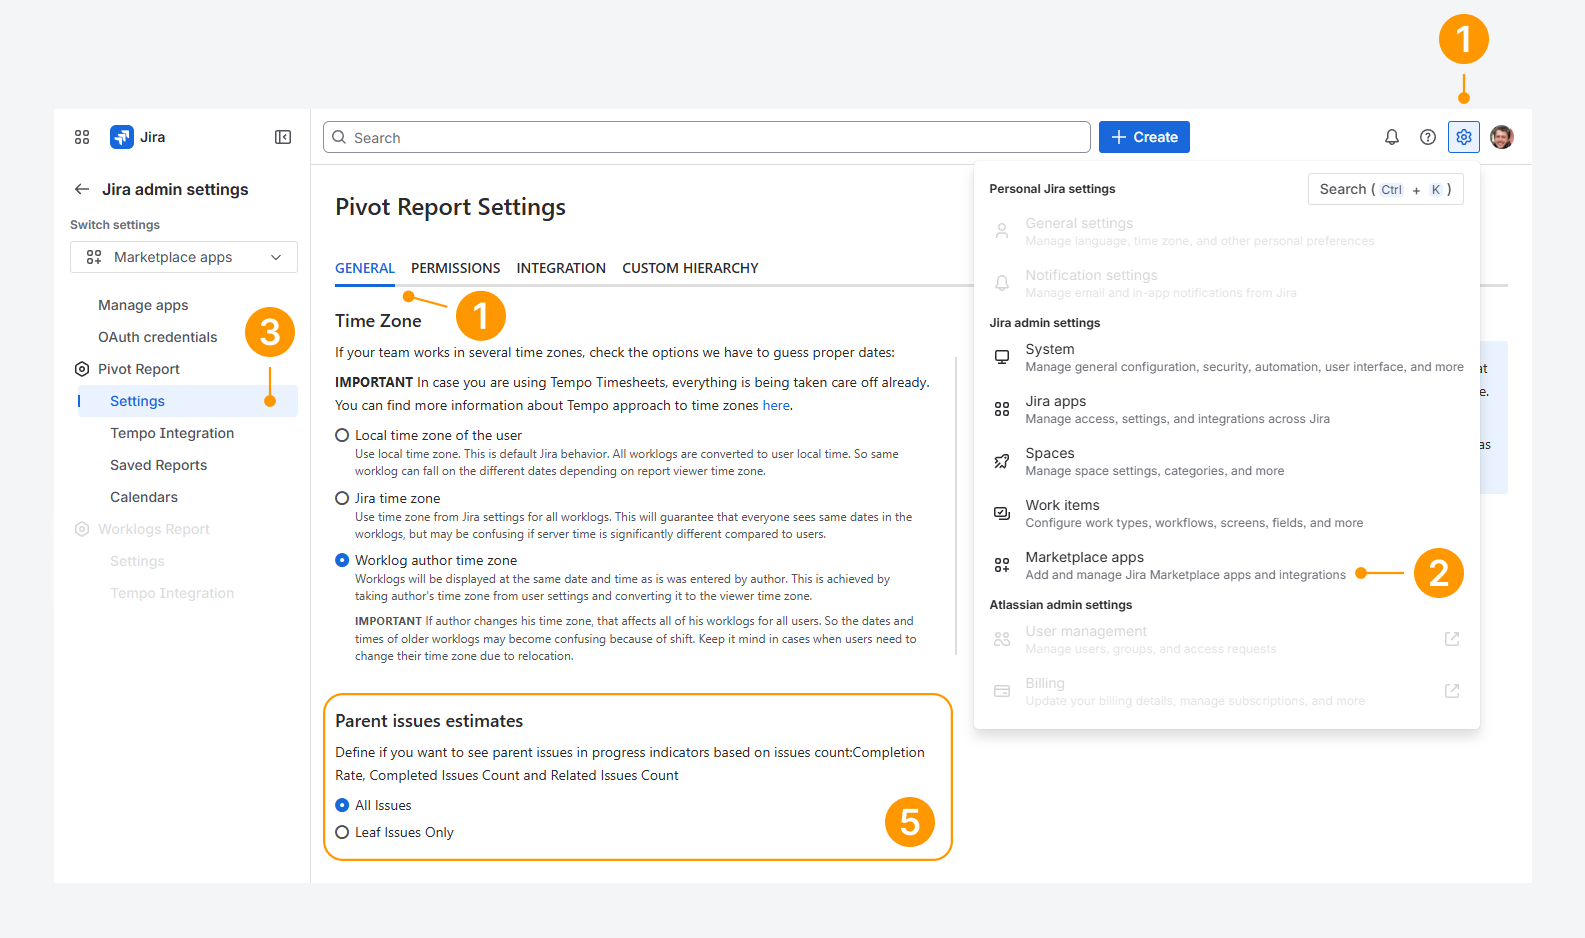
Refer to the related article for details on how progress is calculated for leaf work item in reports.
How can you add widgets to the Work item view?
Any logged-in Jira user with access to both the app and the target space can display and use widgets to create reports using the following steps.
-
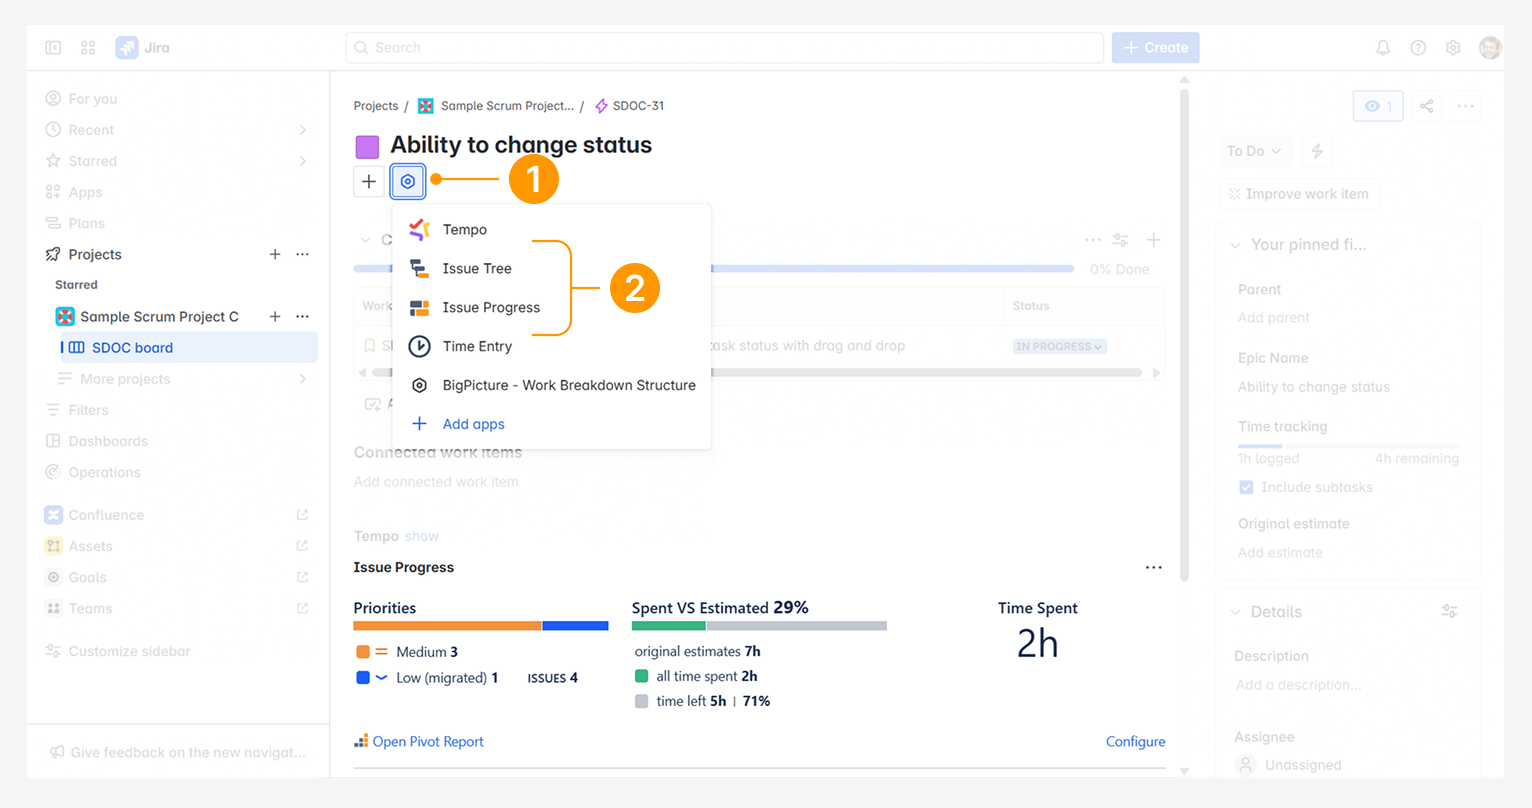
Open a work item in the space and click the App actions menu in the Work item View.
-
From the dropdown, select the widgets you want to display. The order you select them does not affect their display order.
How can you override the default widget fields?
A Space admin or Jira admin can override the default widget fields configured in the app's space settings.
To access the space settings:
-
In the Jira sidebar, open the Spaces list, select a space, and click ••• (Actions).
-
Select Space settings.
-
In the sidebar, expand Apps and select Pivot Report.
-
On the Pivot Report Space Settings page, open either the Work item Progress or Work item Tree tab to configure the default widget fields.
Alternatively, open a work item, locate the Work Item Progress or Work Item Tree widget, and click Configure in the bottom-right corner of the widget. This opens the corresponding tab in the Pivot Report Space Settings page.
Override Work item Progress Widget contents
-
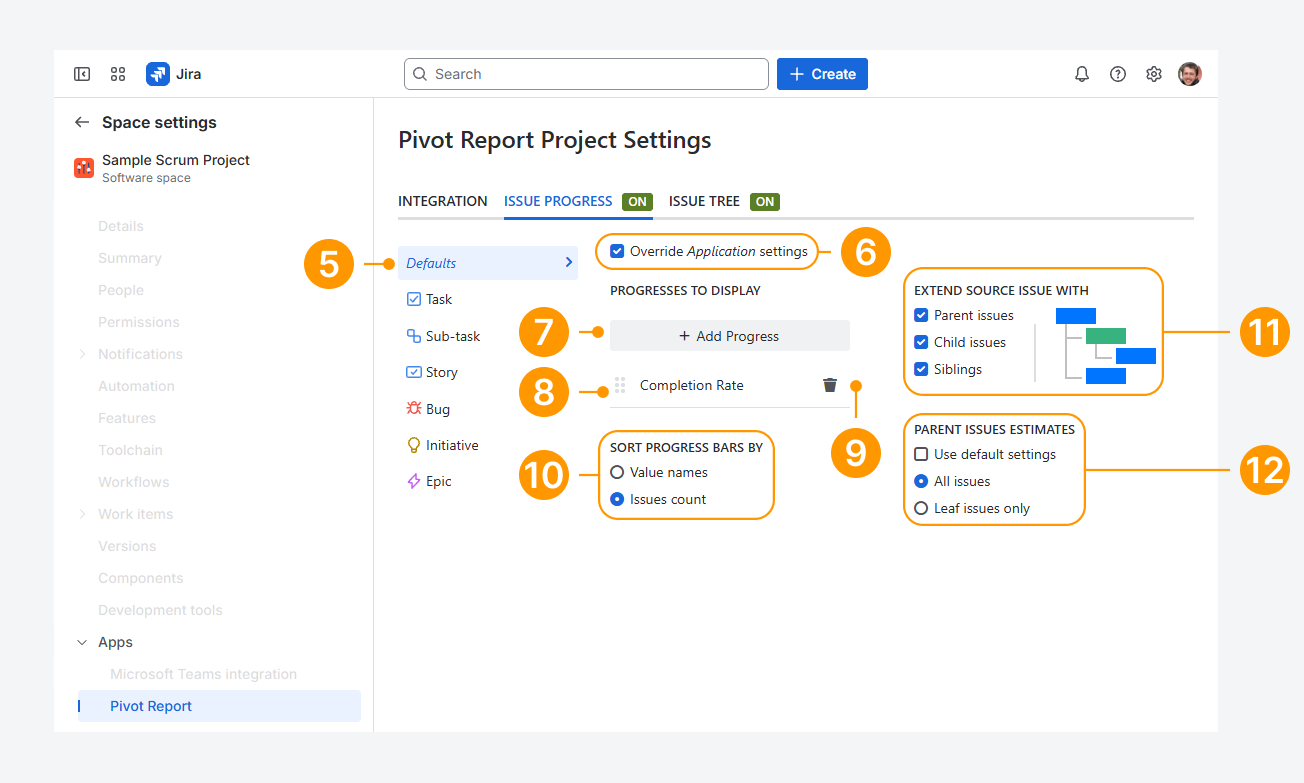
In the Work item Progress tab, select Defaults to configure the settings that apply to all work types in the space. You can then override these settings for individual work types.
For example, you can configure one set of settings for Defaults, which applies to all work types except Tasks, and a different set of settings specifically for Tasks.
-
Select Override application settings to override the default settings inherited from the app's space settings.
-
Click Add Progress to add a progress indicator.
-
(Optional) Drag a chart using the grid icon (the dotted handle on the left side of the chart card) to change its order when multiple charts are displayed.
-
(Optional) Click the bin icon on the chart card to remove a chart.
-
(Optional) Select how indicators in the widget are sorted:
Value names: Sorts indicators alphabetically.
For example, components in a progress indicator appear in alphabetical order, such as Design, Management, and Web.Work item count: Sorts indicators from the highest to the lowest item count.
For example, statuses in a progress indicator are displayed based on the number of work items in each status.
-
(Optional) Select how to extend the work item where the widget is displayed.
-
(Optional) Select how the Completion Rate progress indicator is calculated.
Configure default Work item Tree Widget contents
-
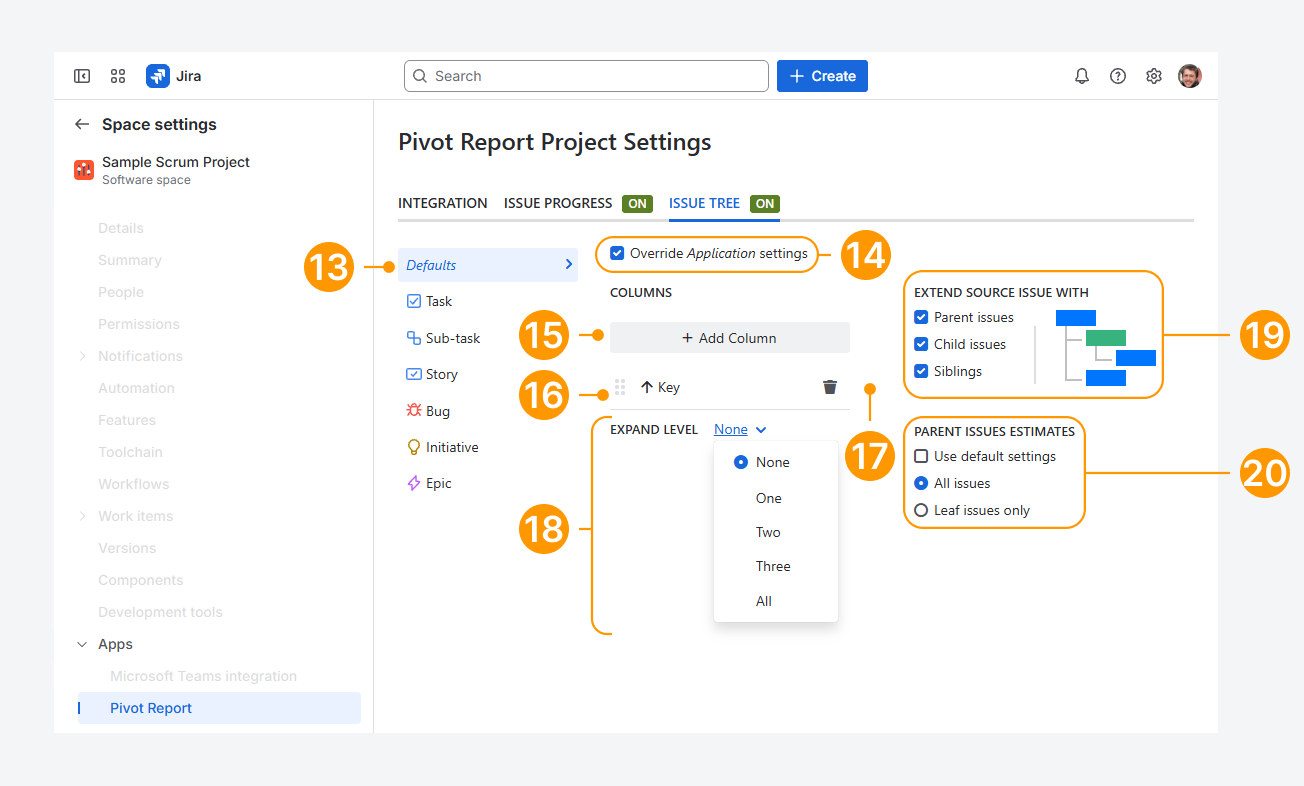
In the Work item Tree tab, select Defaults to configure the settings that apply to all work types in the space. You can then override these settings for individual work types.
For example, you can configure one set of settings for Defaults, which applies to all work types except Tasks, and a different set of settings specifically for Tasks.
-
Select Override application settings to override the default settings inherited from the app's space settings.
-
Click Add Column to add a column.
-
(Optional) Drag a column using the grid icon (the dotted handle on the left side of the column card) to change its order when multiple columns are displayed.
-
(Optional) Click the bin icon on the column card to remove a column.
-
Select how many levels of the work item tree are displayed:
None: Displays only the work item where the widget is added.
One, Two, or Three: Displays the selected number of child levels.
All: Displays the entire work item tree.
For example, if the widget is added to an Epic and the source work item is extended to include parent and child items, selecting All displays the complete hierarchy. Selecting None displays only the Epic.
-
(Optional) Select how to extend the work item where the widget is displayed.
-
(Optional) Select how the Completion Rate progress indicator is calculated.
If you are overriding settings for a specific work item type instead of all work item types in a space, verify that widgets are enabled for those work item types in the space settings.
To check this, open the Integration tab on the Pivot Report Space Settings page by following the steps in the related article.
FAQ
Who can hide widgets in the work item view?
Any logged-in Jira user with access to both the app and the target space can hide a widget by following these steps:
-
Click the actions (•••) menu for the widget you want to hide.
-
Select Hide.
-20250814-004327.png?cb=32c58bda198d60b45f8b70d77a8b330a)
If you display a widget in the work item view for an item, another user with the same app permissions as you can hide it. You will then need to display it again.
Troubleshooting
If you have questions or need assistance, contact our support team via email or service desk. Our team is available Monday through Friday (9:00 AM to 7:00 PM GMT+7) to help with technical challenges or discuss improvements.