
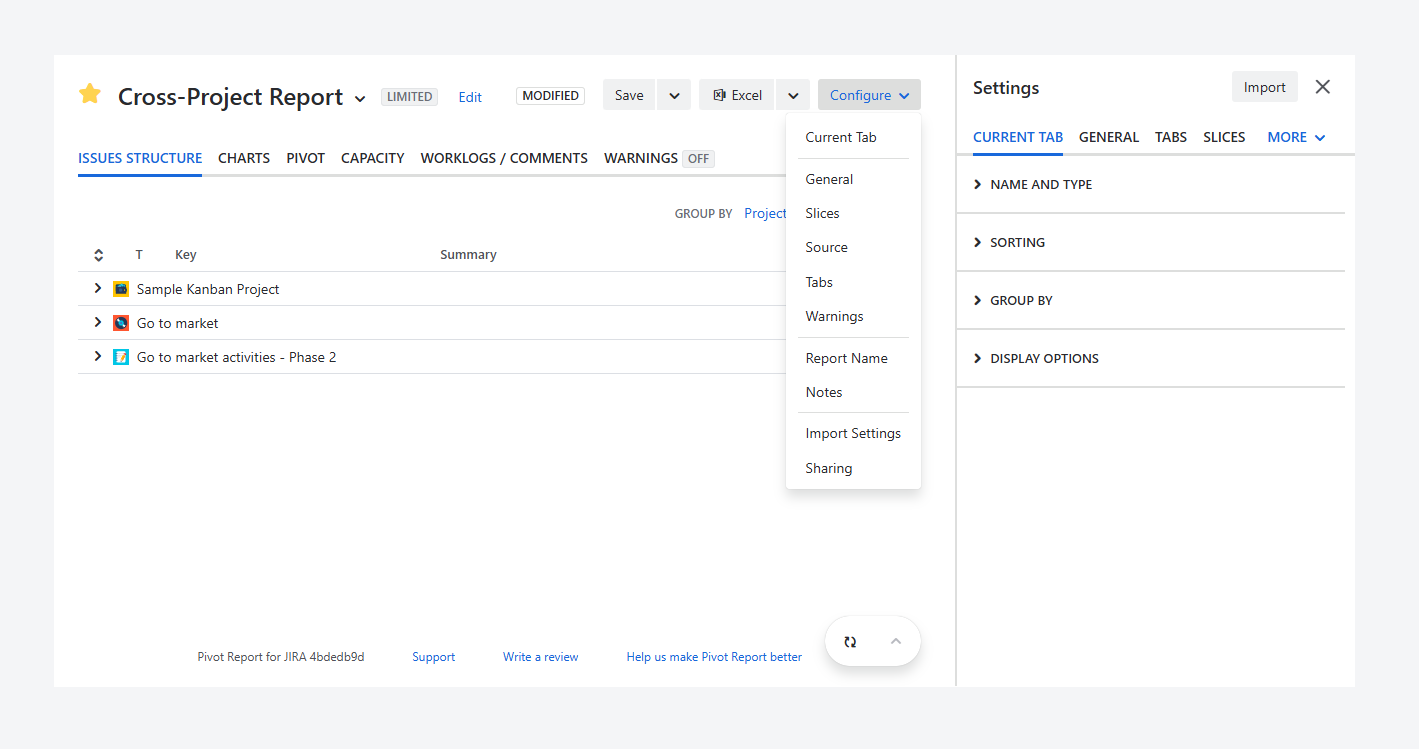
You may have reached this article after locating a report and wanting to change its appearance.
This article explains how to edit a report’s contents and settings using the sidebar in the report, as its owner or admin.
If you want to modify the report’s source rather than its appearance, refer to the separate article.
How can you access the report sidebar?
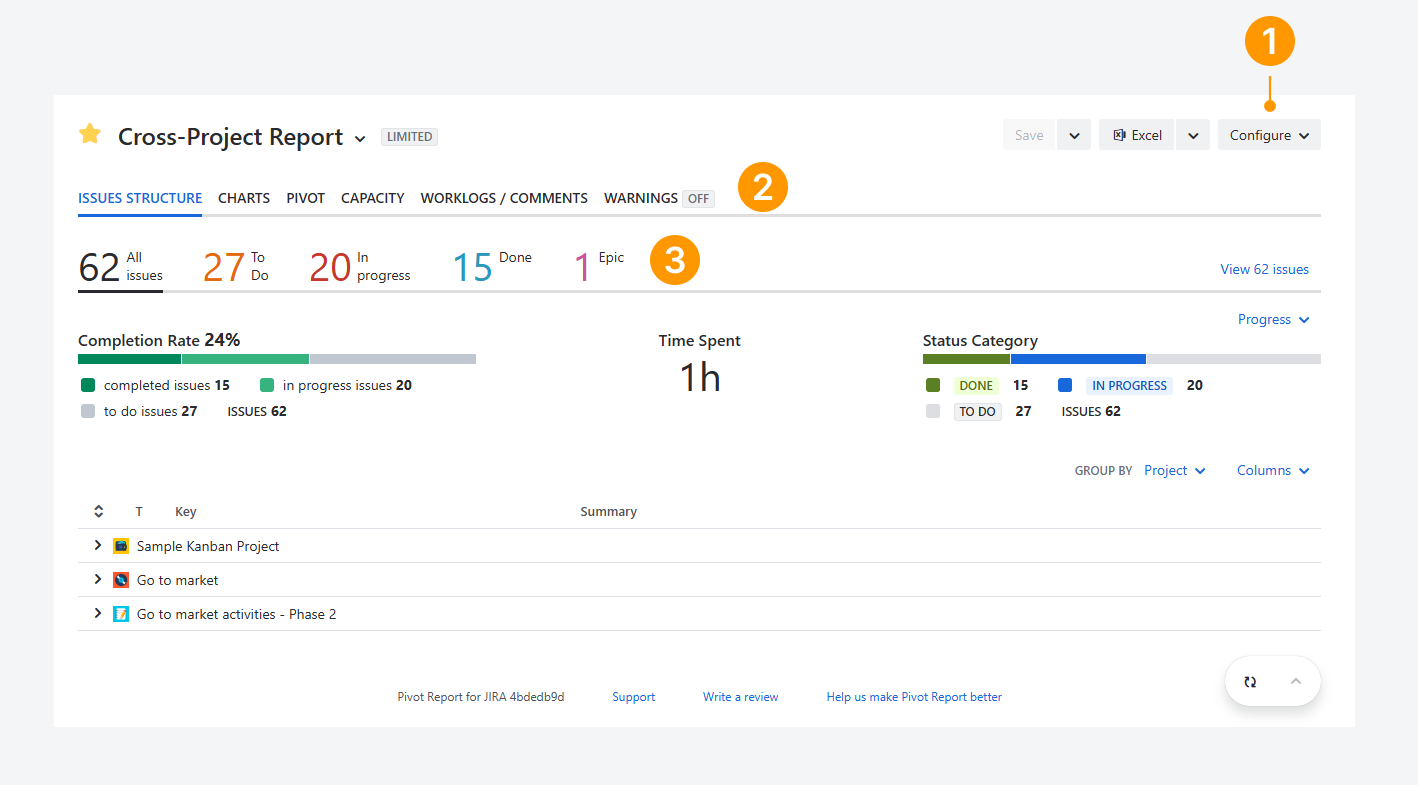
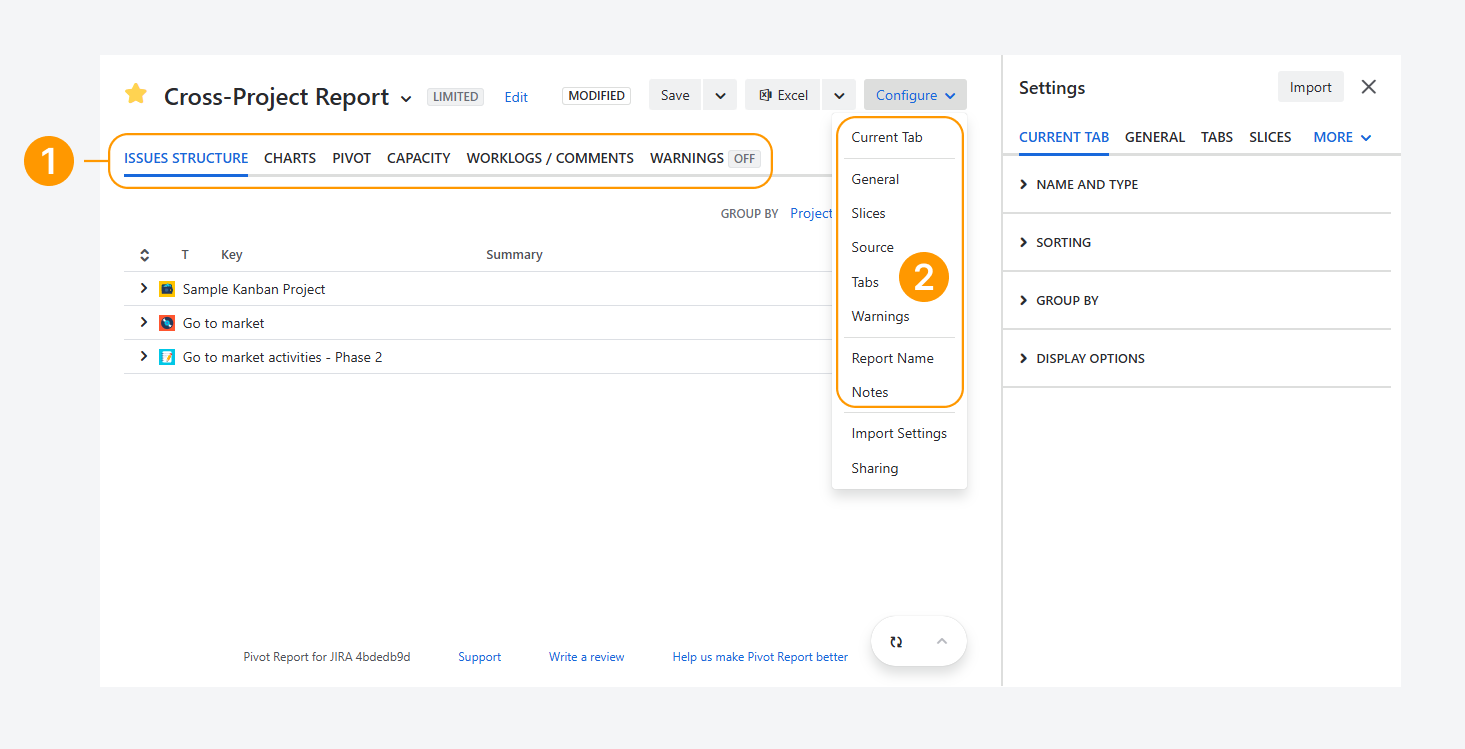
You can open the report sidebar by using the buttons located in the Header, Tabs, Slices, and Summary sections of the report, as shown in the screenshot.
-
Configure: In the Header section, click Configure, then select Current tab from the dropdown menu to open the report sidebar.
-
Configure tabs: In the Tabs section, hover your mouse to the right of a tab and click Configure tabs. In the above screenshot, this button does not appear because the cursor is not positioned in the tabs row.
-
Configure slices: In the Slices section, hover your mouse to the right of a slice and click Configure slices. In the above screenshot, this button does not appear because the cursor is not positioned in the slices row.
Which settings can you change within the report sidebar?
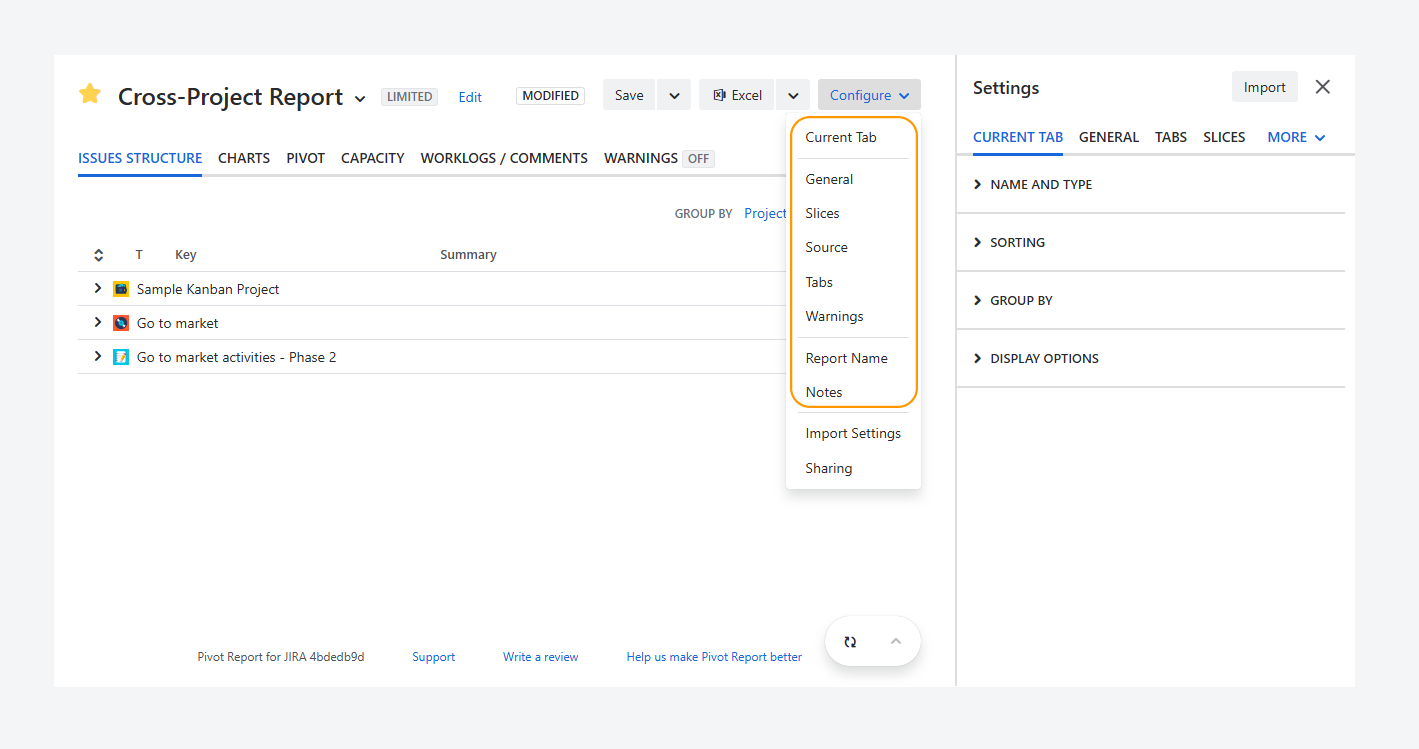
You can use the sidebar tabs to modify the report’s name, description, source, and the layout of rows and columns, among other configurations. The full list of available sidebar tabs appears in the dropdown when you click Configure in the Header, as shown in the screenshot.
-
Current tab: Lets you rename the tab type and show or hide the Slices and Progress sections. The available options vary depending on the selected report tab type.
-
General: Allows you to choose the calendar and time units, and to configure settings related to Slices and Progress indicators.
-
Hierarchy: Lets you select a predefined Jira hierarchy or create a new one that appears in the Structure. The steps for creating a new hierarchy are described in a related article.
-
Slices: Lets you modify the contents of the Slices section by following the steps in a related article.
-
Source: Lets you change the report’s source by following the steps described in a separate article.
-
Tabs: Lets you add, remove, and rename report tab types.
-
Warnings: Lets you choose which warnings appear in the Warnings tab type and which can be shown in report sections.
-
Report name and Notes: Lets you change the report name, add a description with a hyperlink, and include notes, as explained in a related article.
Current tab, General, and Tabs are introduced further below.
Current tab
The following are the most common options available in this sidebar tab. Other options are described in separate articles for specific tab types.
-
Name and type: Click inside the text box to rename the selected tab.
-
Breakdown: Click on the toggle switch to either hide or show the Breakdown section within the selected tab. This option is available for Pivot, Capacity, Worklogs, and Warnings tabs.
-
Display options: Check Show slices, Show progress, or both, to show these sections within the selected tab.
-
Rows, Columns, and Values: Check these options to modify the contents of the Summary section for the selected tab. They are available for Pivot and Worklogs tabs.
-
Charts: Select these options to add charts or modify their contents. This option is available only for the Chart tab type, as described in the related article.
General tab
The following options can be accessed from any tab type.
-
Calendar: Select a calendar, or click View Calendar to see its sharing type and the days included in the report.
-
Time units: Choose whether to use Jira’s default time-tracking format (for example, 1w 3d 2h 15m) or units displayed in Hours, Days, Weeks, or Months.
-
Misc:
-
Slices: Choose whether slices affect progress indicators based on app-level or report-level settings. The effect of this option is explained in a related article.
-
Progress: Choose whether bars in progress indicators are sorted by count or by value name.
-
Parent estimates: Choose whether Completion Rate, Completed Count, and other indicators include all or only leaf
-
Tabs
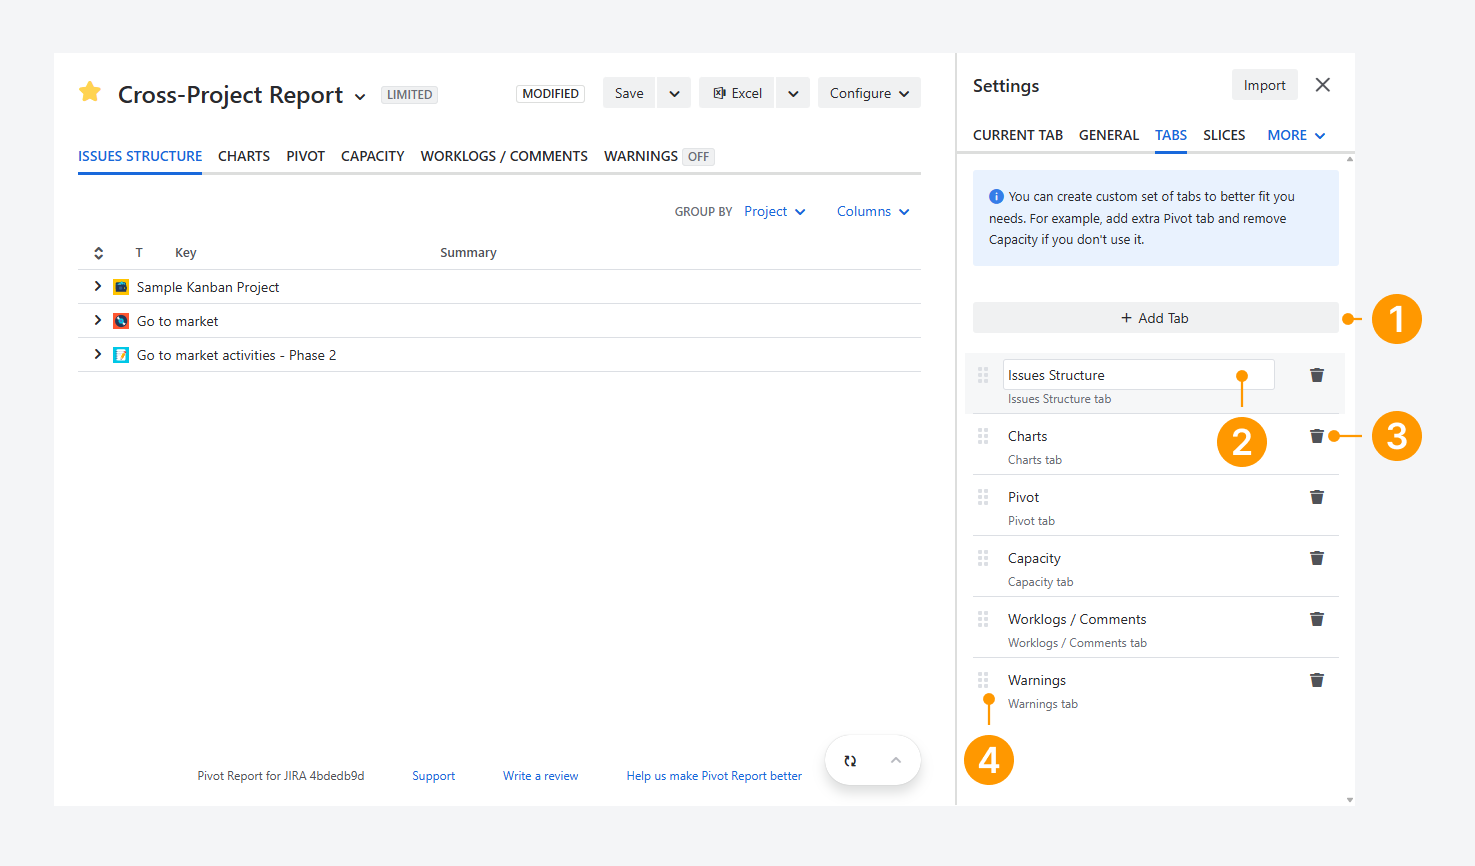
The options shown in the screenshot allow you to rename, remove, reorder, or replace tab types.
-
Activate a tab: Click Add Tab, open the dropdown menu, and select a tab type you want to add. A report can contain up to eight tabs in total.
-
Rename a tab: Hover over the tab name, then click the text field to edit it. The tab type remains unchanged and appears below the tab name.
-
Remove a tab: Click the bin icon on the tab card to remove the tab. At least one tab type must remain in the report.
-
Reorder a tab: Drag a tab using the grid icon (the dotted handle on the left side of the tab card) to change the tab order.
What is the different between a tab type and sidebar tab?
-
The tabs section includes six tab types by default. Each type lets you focus on a different area of the report source. These tabs can be renamed, removed, reordered, or replaced. Also, a report can contain between one and eight tabs of any type.
-
Report sidebar tabs cannot be modified. There are eight sidebar tabs that let you configure the appearance and contents of each tab type.
Features and use cases
Use the same tab multiple times and rename it
You can use the same tab type more than once. In the example below, the Pivot tab type is used three times.
Each tab has its own name and settings to analyze the data in a different way, while using the same report source across all tabs.
-20260316-231536.png?cb=1414f6cd8f62ce6d6872ffcac17a2e3c)
This example is available as a demo and can help you add more tabs with custom names.
Import report settings without sharing or copying a report
-20260317-140149.png?cb=d26a69c26bba616515b932761029b7ad)
You can import report settings, including the list of tab types and their configurations, without sharing or copying the report, by following the steps in a separate article.
FAQ
Troubleshooting
If you have questions or need assistance, contact our support team via email or service desk. Our team is available Monday through Friday (9:00 AM to 7:00 PM GMT+7) to help with technical challenges or discuss improvements.