
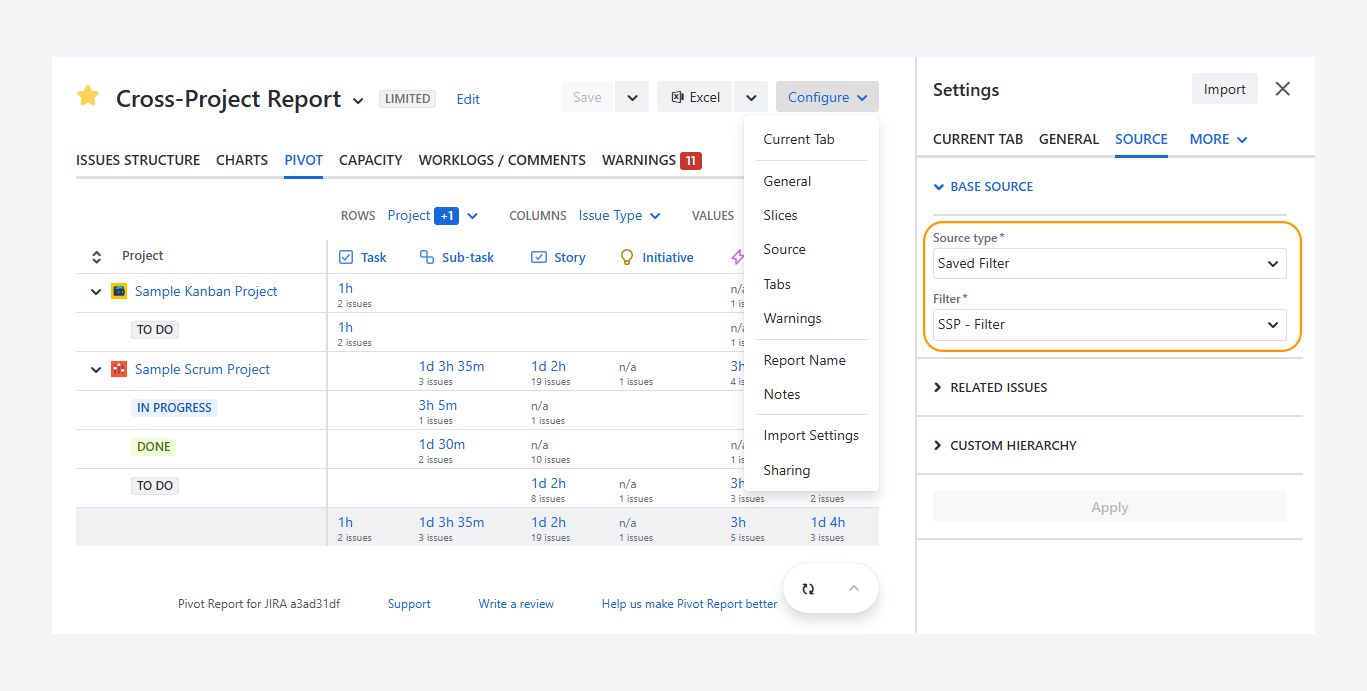
You may have reached this article after creating a report by following steps in a separate article and now want to refocus the report by updating its source.
This article explains why you may need to change a report’s source and how to access it from the report sidebar.
If you want to modify the report’s appearance rather than its source, refer to the separate article.
Why you should change a report’s source?
A report’s source may change as its scope or audience changes.
For example, you may extend the scope to include another project. This change allows the report to show both projects and their interdependencies.
In other cases, you may reduce the scope to focus only on the remaining Epics in a project. This narrower view can support external clients who monitor progress through the report.
Features and use cases
Extend the report source
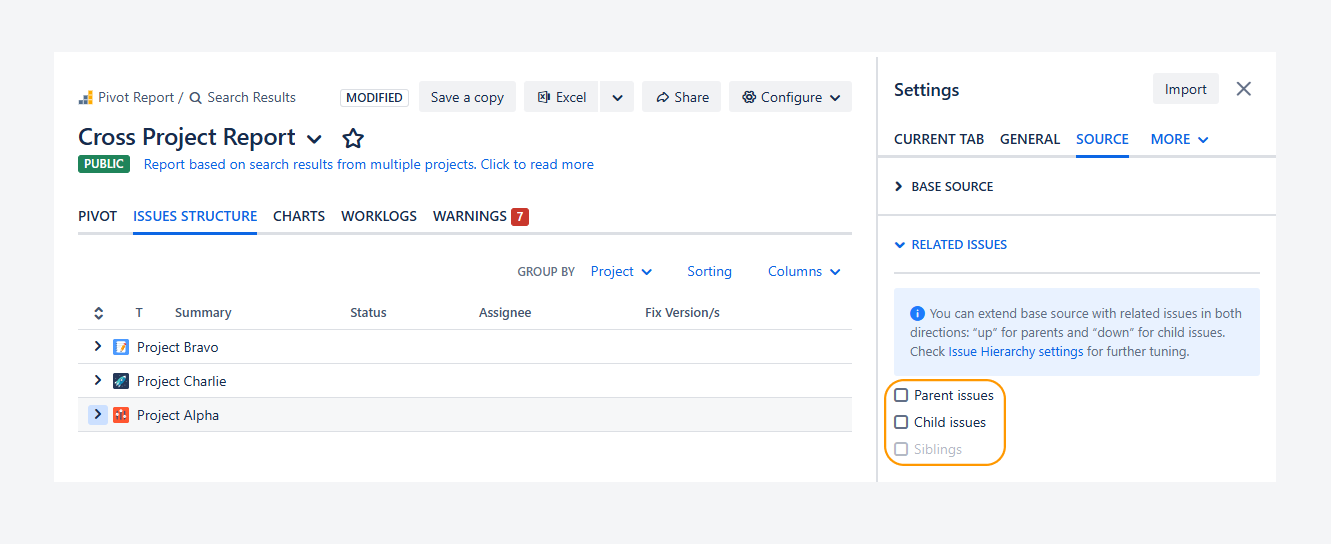
When creating a report, you can extend it by including parent and child issues. If you want to add or adjust how the report is extended—without changing the base source—you can use the Related issues section.
Available options:
-
Parent issues: Includes the parent of each issue in the report source.
For example, if your source includes Stories, their parent Epics are added to the report.
-
Siblings: Includes issues that share the same parent.
For example, this adds other issues under the same Epics, such as additional stories and their sub-tasks. This option is available only when Parent issues is enabled.
-
Child issues: Includes child issues for each item in the report source.
For example, if your source includes Stories, their sub-tasks are added to the report.
Limitations after report creation:
The following options cannot be added or modified in the report sidebar after the report is created using the Issue Navigator:
-
Use sibling issues in estimates only: Includes sibling values in rollup fields—such as ∑ Original Estimate, ∑ Time Spent, and ∑ Remaining Estimate—without adding those issues to the report.
For example, Epic-level totals include estimates from all related issues.
-
Use child issues in estimates only: Includes child issue values in rollup fields without adding those issues to the report.
For example, Story-level totals include estimates from sub-tasks.
For instructions on creating a report using the Issue Navigator, refer to the related article.
Locate deliverables assigned to the wrong parent
You can expand the report source by including parent, child, or sibling issues to find issues whose parent belongs to another project.
-20260319-032838.png?cb=2e0b0b7a8ef8f18fd806341b11e540ca)
-
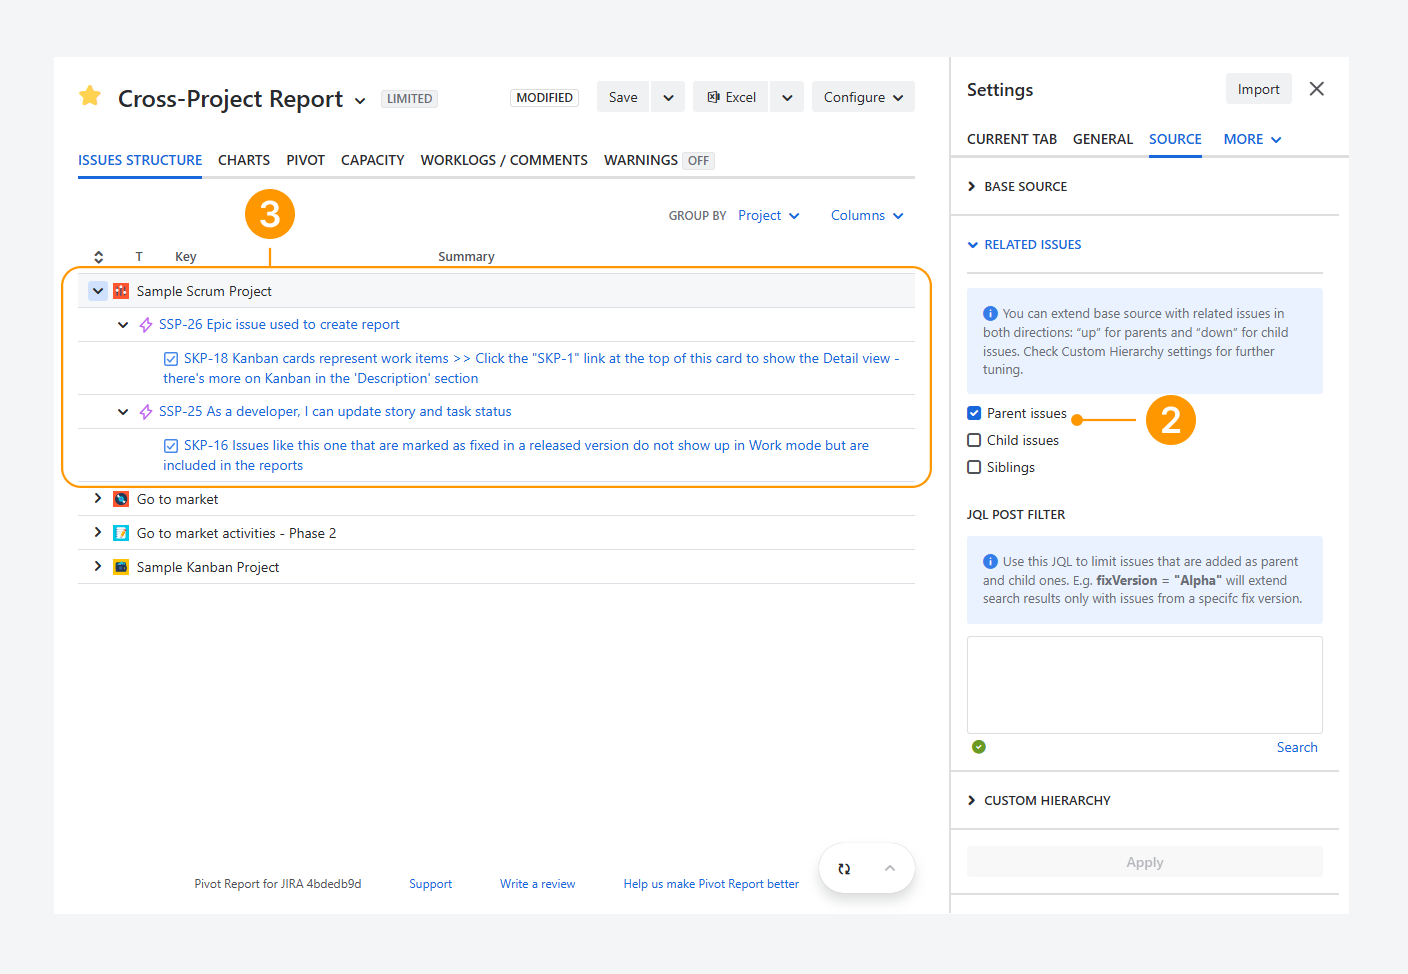
For example, a report source includes three projects, as shown in the screenshot above.
-
By extending the report to include Parent issues, a fourth project (Sample Scrum Project) can appear.
-
When reviewing the hierarchy in this project, you can identify issues whose parent belongs to another project by checking the issue key. If the letter prefixes differ between parent and child issues, they belong to different project.
These issues may be assigned to the wrong parent or project.
In other cases, issues in one project may depend on issues in another. A parent relationship may have been used to represent this dependency when the issues were created.
Use 'Blocked by' or another link to show a parent relationship
You can add links, such as as Blocked by, in the Issue View to represent a relationship with a parent item in your organization and display it using a custom hierarchy in a report. Other organizations may use different links, such as Belongs to, for the same purpose.
Make sure to extend the report source to include parent issue when they belong to another project. For example, an Initiative may act as a parent issue—through a relationship link—but exist in a different project than its Epic.
If the report source only includes the Epic and is not extended to include parent issues, the Initiative will not appear after enabling the custom hierarchy.
Follow these steps to verify relationship links, extend the report source, and configure a custom hierarchy:
-
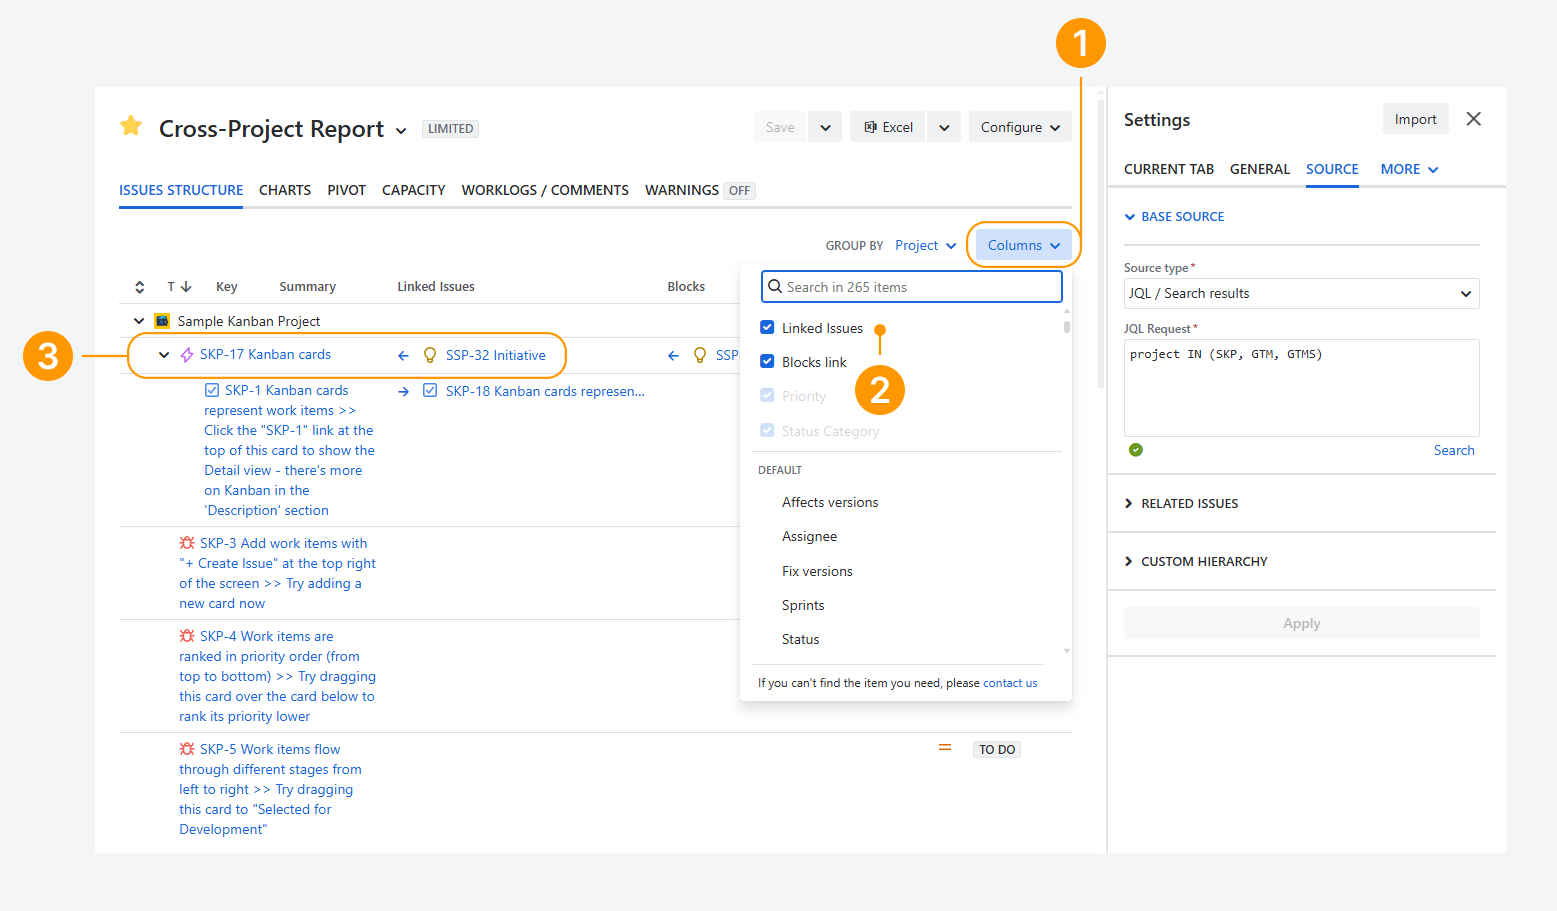
In this example, the report source references three projects using JQL. Click Columns.
-
Select or search for Linked Issues.
-
Identify the highest-level parent and determine the relationship type. In this example, Epic SKP-17 blocks Initiative SSP-32, which belongs to a project not included in the report source.
-
Enable Parent Issues to extend the report source.
-
Click Apply.
-20260325-174927.png?cb=1bccc549d224972b24b462c5584e66b3)
-
Click + Add Link Type.
-
Select a Parent Issue Type, Link Type, and Child Issue Types.
In this example, Initiative SSP-32 is blocked by Epic SKP-17. As a result, Initiative is the parent issue type and Epic is the child issue type.
-
Click Apply.
-20260325-181257.png?cb=8df1d9a687e876c5b139dee6f45ca07f)
After completing these steps, the parent relationship appears in the hierarchy, as shown in the screenshot below.
Note that Epic SKP-17 is grouped under the project associated with its parent Initiative as part of the custom hierarchy.
-20260325-182108.png?cb=e22887566ec9016b81ea3fe72b084a9c)
Refresh the report after updating the source without reloading the webpage
-20260307-011344.png?cb=939e2f7025f204ec54cf06ae709aaf1d)
You can refresh the report data without reloading the webpage. This avoids saving the report and then reloading the page to display and interact with the updated report content.
For reports that reference thousands of issues or more, reloading the webpage usually takes longer than refreshing the data.
After you update or extend the report source, a red dot appears next to the Refresh icon, as shown in the screenshot above. Click this icon to refresh the report data.
This action works the same as clicking Apply in the Source sidebar tab after updating or extending the source.
-20260307-012218.png?cb=90b6aac47089136eb88137faee615079)
Refence multiple projects when creating a report
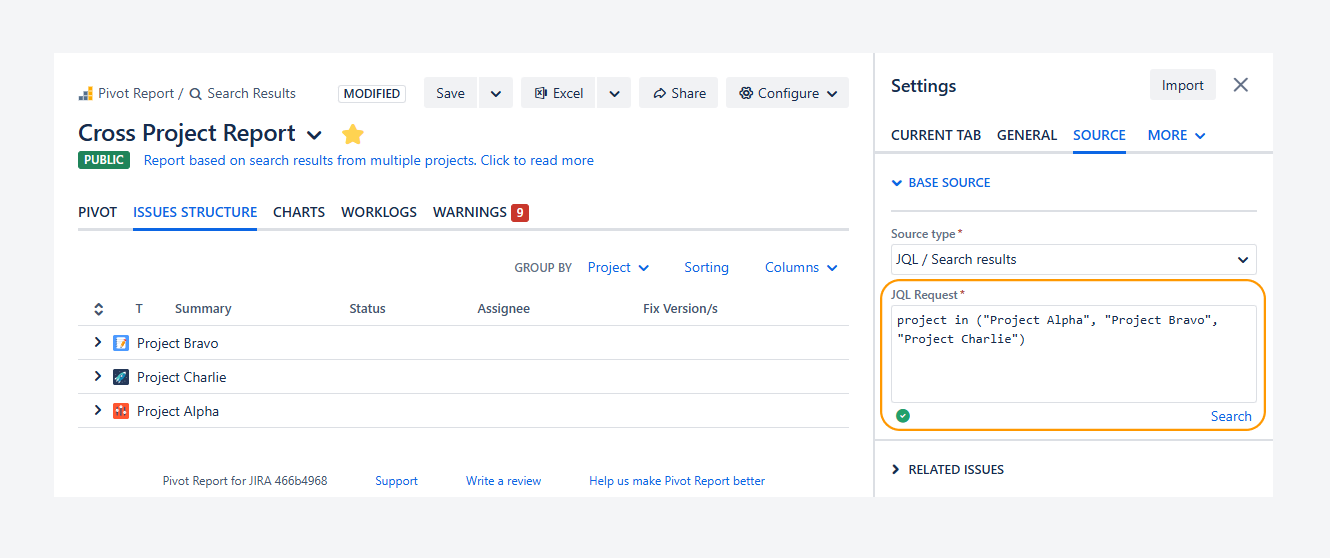
A report’s source can include multiple projects. You can reference multiple projects when creating or modifying a report by using JQL or a filter from Jira’s Issue Navigator.
A Board that references multiple projects through JQL or a filter can also be used as a report source.
The report shown in the screenshot of the Cross Project demo report below is based on JQL referencing three projects.
Update the source as your report focus evolves
When creating a report, the source you choose depends on the report’s goal. You may use it for retrospective analysis, such as a sprint or release report. You may also use it to present highlights, such as a monthly client report. In other cases, the report supports monitoring activities, such as tracking overspending or scope additions in an active project.
In each situation, the report’s focus—and therefore its source—may change as you gain new insights from the data.
For example, if you want to monitor scope changes in a project, set the source type to Project. Show up to 500 recently created issues and do not exclude resolved issues.
-20260307-025036.png?cb=938b14a91c8edfbc4a4b0f9b753e704b)
In the Issue structure tab, you can see the cumulative impact of these issues on the project's Original estimate. In this example, the most recently created issues added 1 day and 2 hours to the project estimate. This increase represents a scope addition.
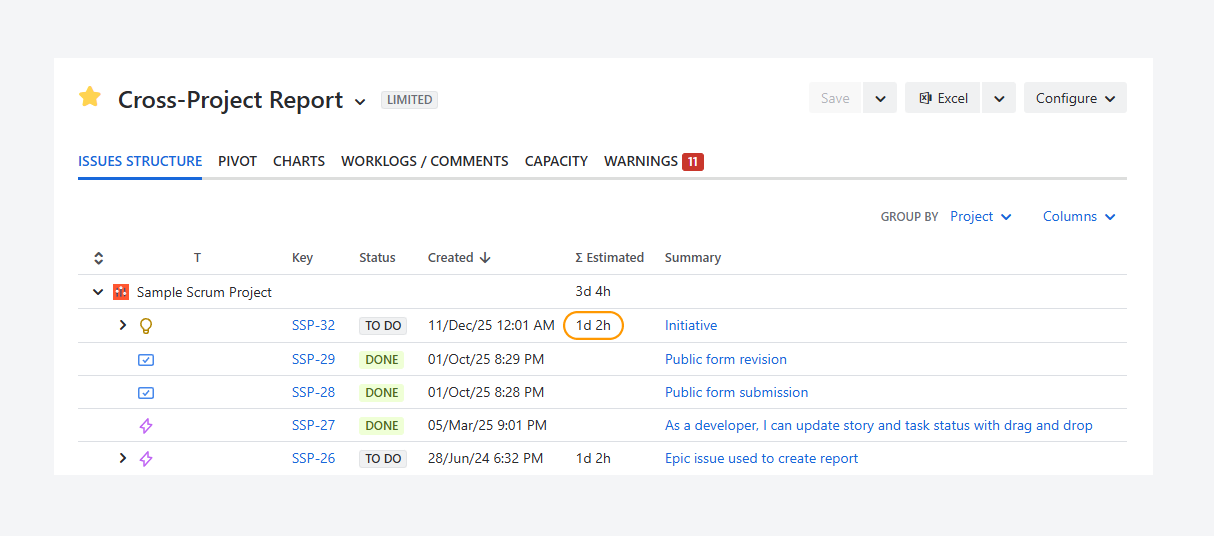
To check whether an external source caused this change, add the Linked Issues column. This column helps you see whether dependencies come from outside the project. After adding it, a pattern appears: the most recently created issues include dependencies on another project.
-20260307-031344.png?cb=28c50de6dc682d1dd18bc50b7f3a004b)
Next, update the report source so it includes both projects. To do this, switch from a Project source type to a JQL source type.
-20260307-032634.png?cb=67b4b2fd0fd4a6fd63e246455d93df35)
Then open the Pivot tab. Here, you can review the status of issues across both projects by using Status Category as columns. To see how many issues are missing estimates, use Warnings as rows and Original Estimate SUM as values.
One project may cause new issues to appear in another through dependency links. However, the full impact of future scope additions and their dependencies becomes clear only after you estimate the effort required for active issues flagged by Warnings.
How can you change the report source?
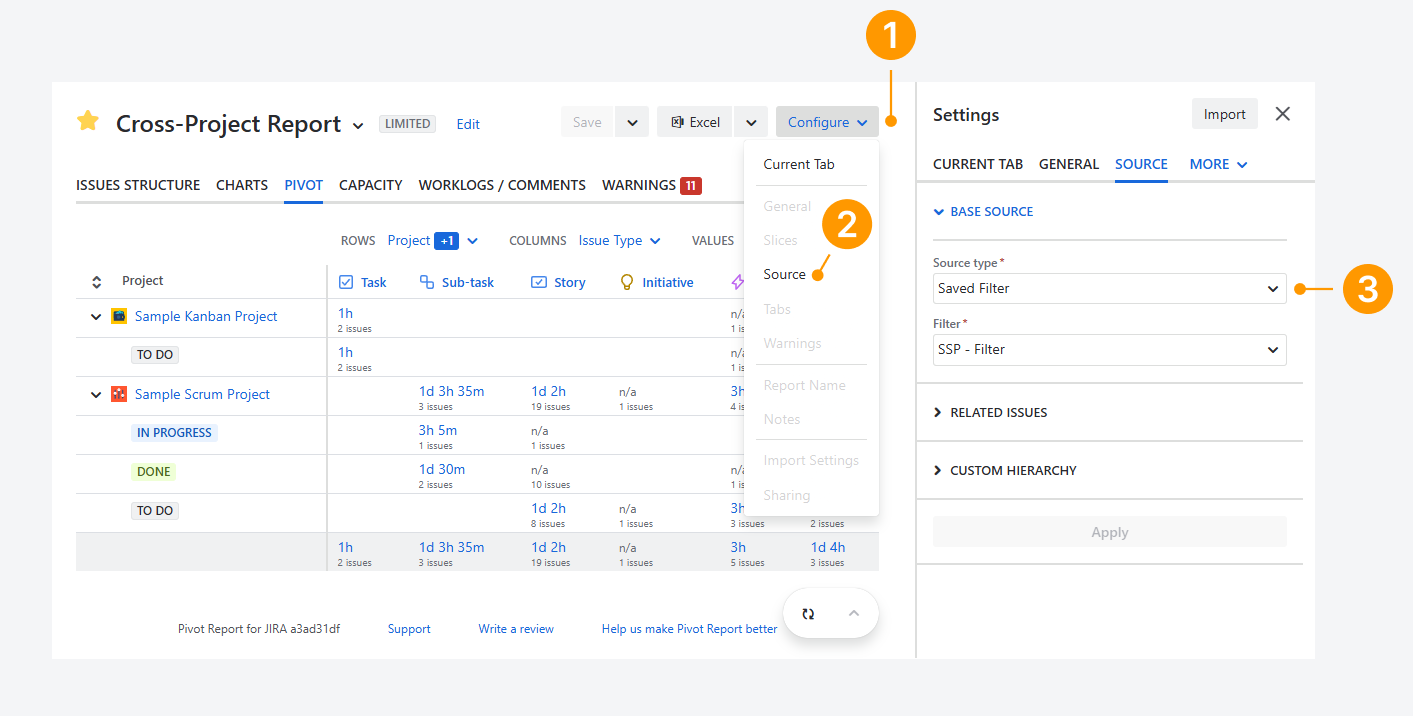
The Source tab can be accessed from the report sidebar by following these steps:
-
Click Configure in the header section.
-
Select Source in the dropdown.
-
Select a Source type.
What source types can you change?
Within Source tab, shown in the previous section, you can select one of six available source types to update a report:
Project
-
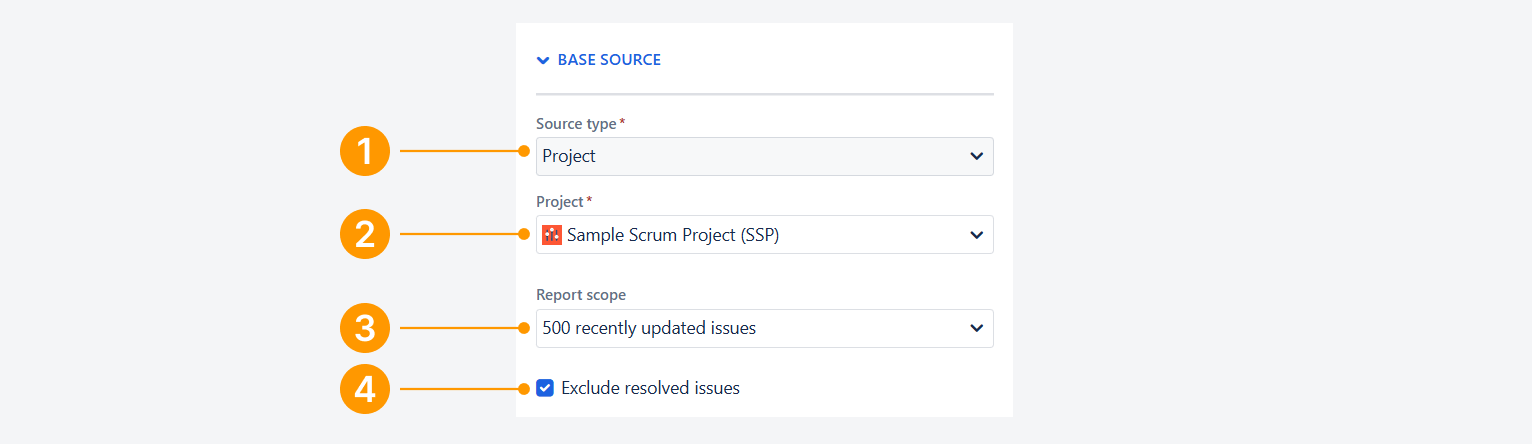
Set the Source type to Project.
-
Select the project to be referenced in the report.
-
Under Report scope, choose whether to include issues that were recently created or updated, and limit the scope to 100, 250, or 500 issues.
-
Optionally, check Exclude resolved issues to exclude issues with the status category ‘Done’ in the report.
-
If needed, check the options to include parent, child, and sibling issues to extend the report.
-
Click Save and Reload.
Board
You can change the Source type to a Kanban or Scrum board.
Kanban Board
-
Set the Source type to Board.
-
Select the board to be referenced in the report.
-
Optionally, select all applicable sprints from the Board to filter issues for the report. The report will include:
-
Issues not listed in the Kanban backlog.
-
Issues listed in the Kanban backlog.
-
All issues.
-
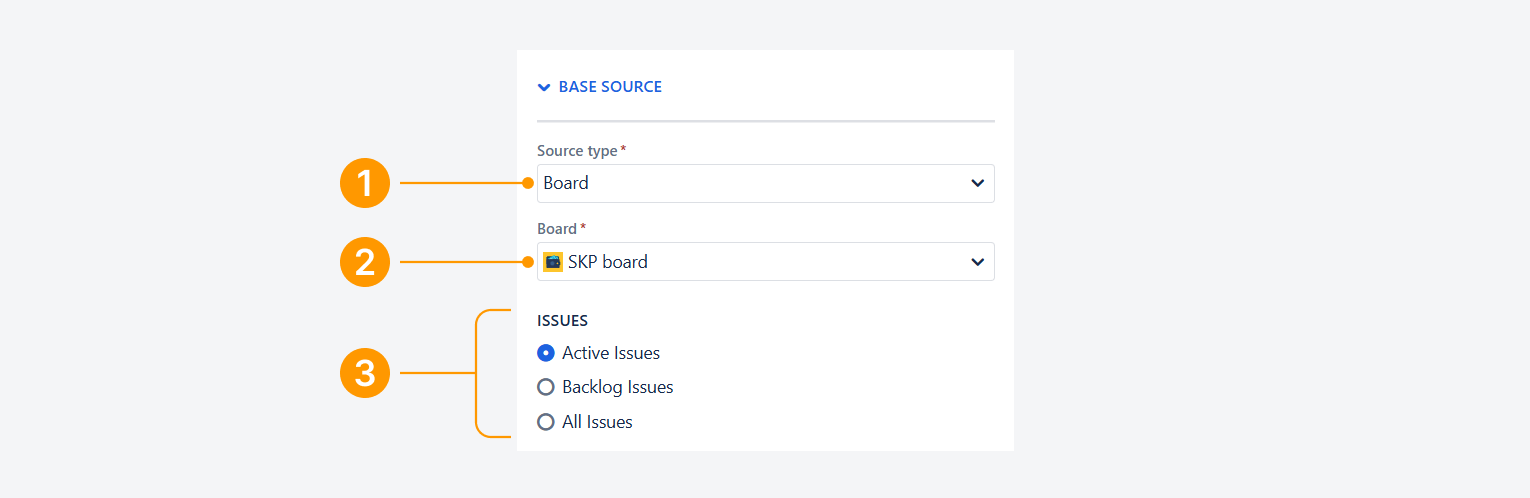
-
If needed, check the options to include parent, child, and sibling issues to extend the repor.
-
Click Save and Reload.
Issues in the Unmapped statuses column will not appear in the report, as mentioned in a related article.
Scrum Board
-
Set the Source type to Board.
-
Select the board to be referenced in the report.
-
Optionally, select all applicable sprints from the Board to filter issues for the report. The report will include:
-
Issues from active sprints (one or multiple).
-
Issues from all future sprints following the active sprint.
-
All active issues not assigned to an active or future sprint.
-
Issues from closed sprints.
By default, Active Sprints is selected and greyed out. It can be unchecked once another option is chosen.
-
-
Optionally, select all custom sprints from the Board to filter issues for the report.
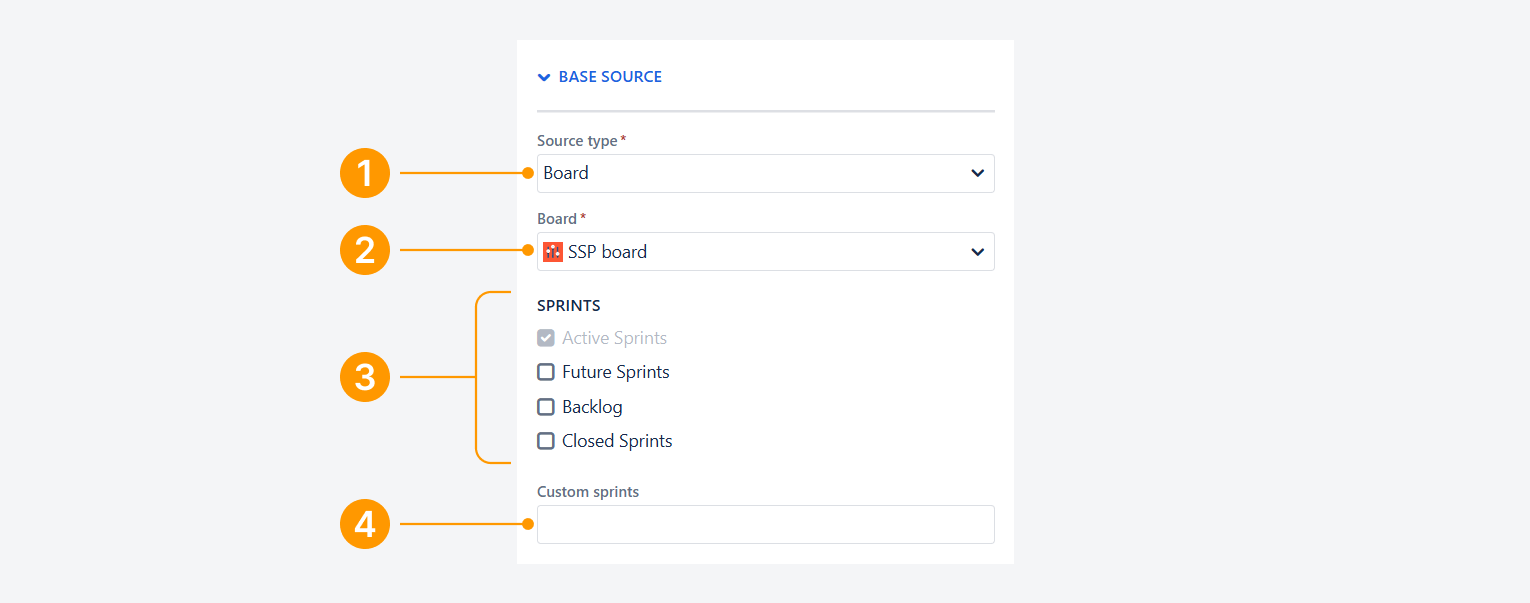
-
If needed, check the options to include parent, child, and sibling issues to extend the report.
-
Click Save and Reload.
Issues in the Unmapped statuses column will not appear in the report, as mentioned in a related article.
Service Queue
-
Set the Source type to Service Queue.
-
Select the Jira Service Management project to be referenced in the report.
-
Select a Queue. The default three queues for a Service Project are ‘All My Tickets,’ ‘All Open Tickets,’ and ‘Open Tasks’.

-
If needed, check the options to include parent, child, and sibling issues to extend the report.
-
Click Save and Reload.
Saved Filter or Issue
Saved Filter
-
Set the Source type to Saved Filter.
-
Select the filter to be referenced in the report.

-
If needed, check the options to include parent, child, and sibling issues to extend the report, which are defined by Atlassian in a related article.
-
Click Save and Reload.
Issue
-
Set the Source type to Issue.
-
Select the issue to be referenced in the report.

-
If needed, check the options to include parent, child, and sibling issues to extend the report.
-
Click Save and Reload.
JQL / Search results
-
Set the Source type to JQL / Search results.
-
Enter the JQL query to be used in the report.
-
If the query is valid, a green checkmark will appear (see screenshot).
-
To troubleshoot the query in the Issue Navigator, click the Search link and follow the steps in a related article.
You cannot save the report until the query is considered valid.
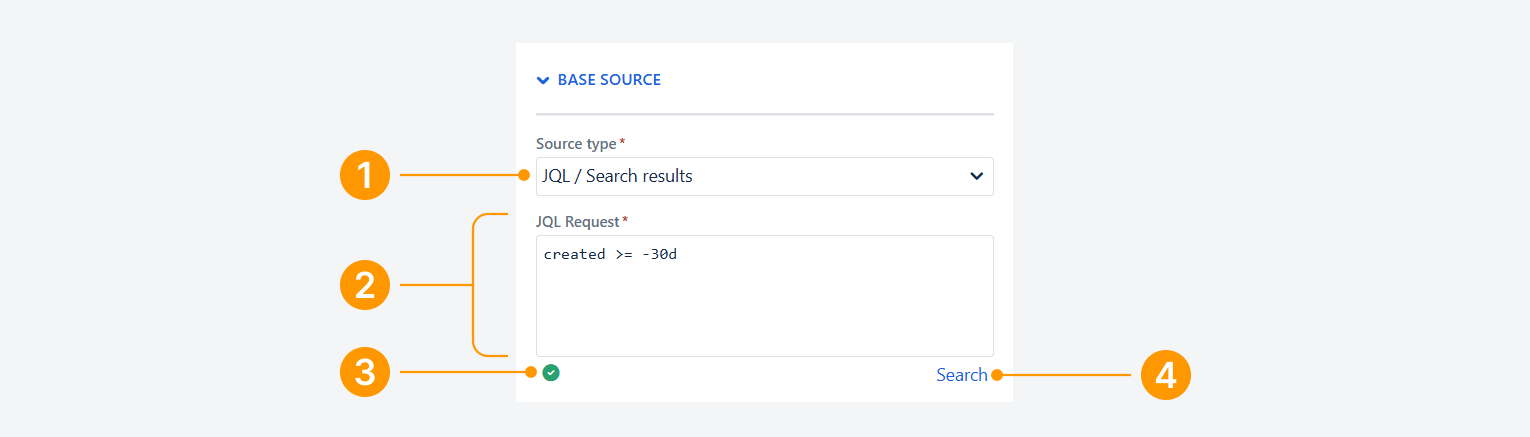
-
If needed, check the options to include parent, child, and sibling issues to extend the report.
-
Click Save and Reload.
Related Issues and Post filter
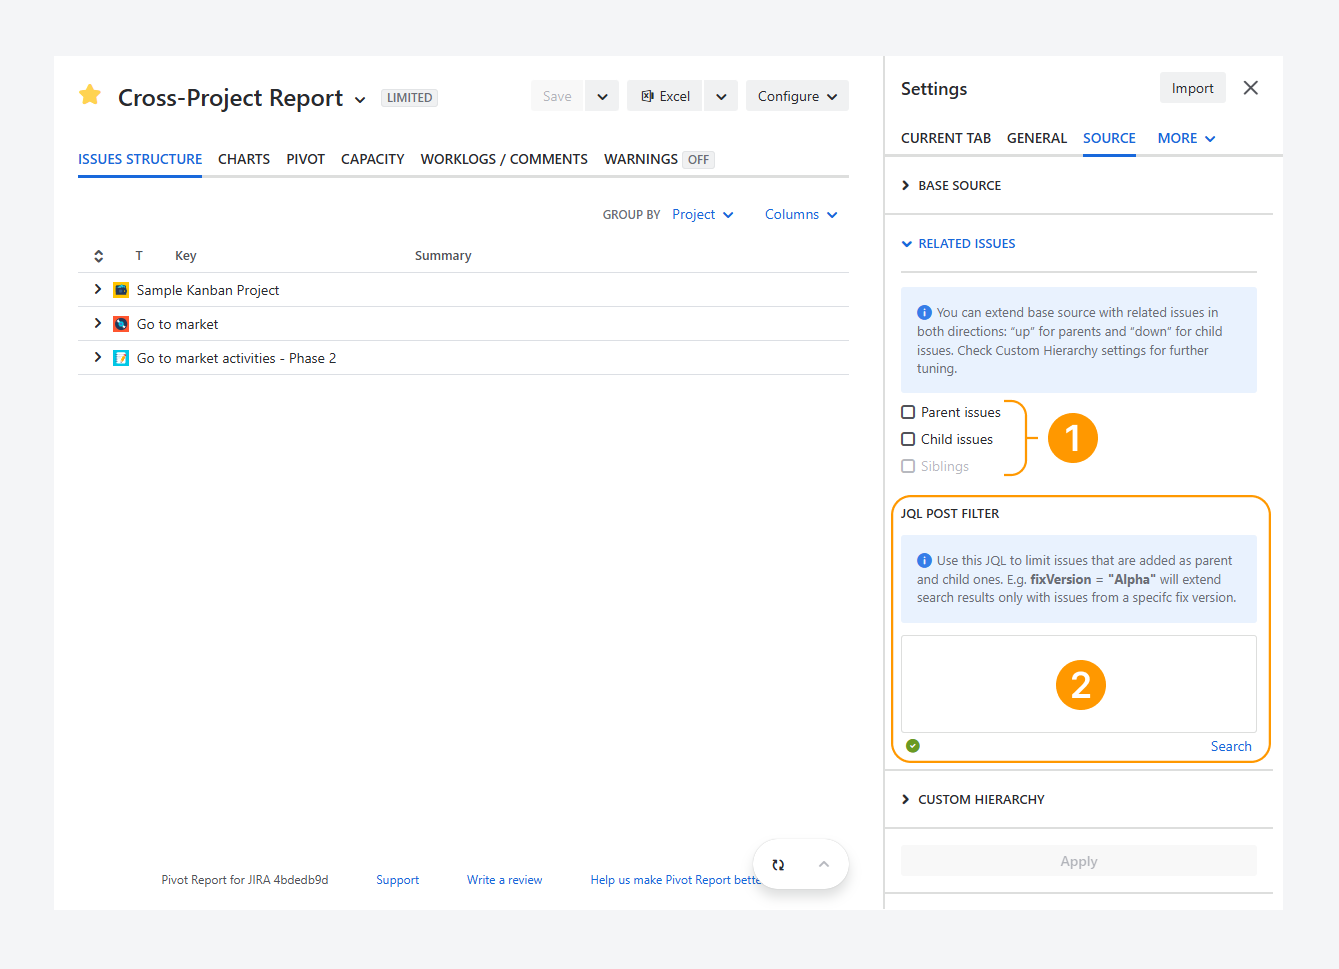
For any Source type, you can use Related Issues options to expand or narrow the report scope, or both.
-
Expand scope: Extend the report by including parent, child, and sibling issues alongside those already in the report source.
-
Post filter: Use an additional JQL query to filter the report source and any extended results from related issues.
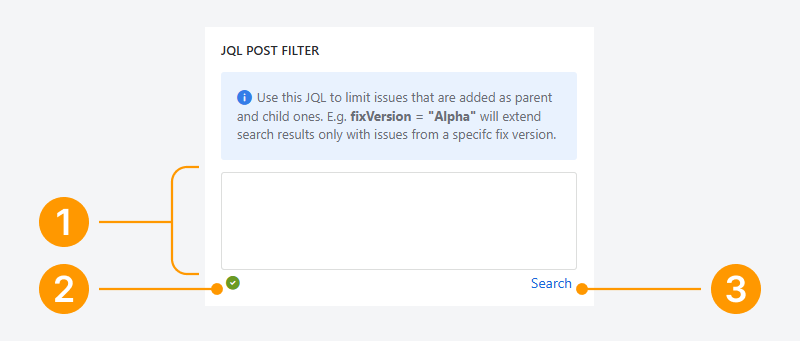
To use the JQL post filter:
-
Enter the JQL query to be used for filter the report source with or without extended content.
-
If the query is valid, a green checkmark will appear (see screenshot).
-
To troubleshoot the query in the Issue Navigator, click the Search link and follow the steps in a related article.
You cannot save the report until the query is considered valid.
FAQ
Troubleshooting
Can you switch between Basic and Advanced JQL search modes?
In the Issue Navigator, you can switch between Basic and Advanced (JQL) search modes.
If Basic mode is selected, click JQL to switch to Advanced mode.
If Advanced (JQL) mode is selected, click Basic to switch back.
On Data Center, the Basic option appears only when ‘JQL’ is selected. On Cloud, both options are visible at all times.
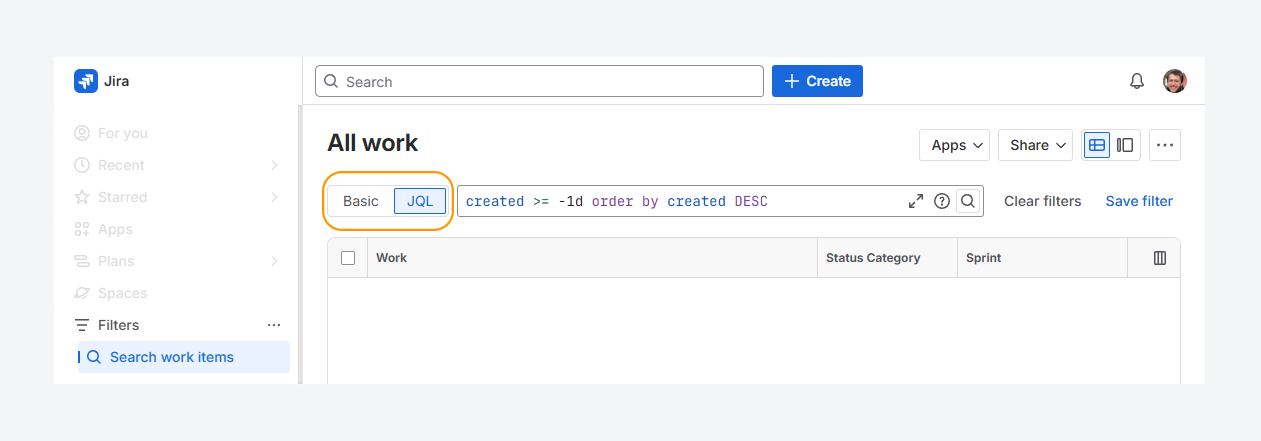
For more details on using Basic / Advanced search for Cloud and Basic / Advanced search for Data Center, refer to Atlassian's documentation.
How can you resolve the unbound queries error?
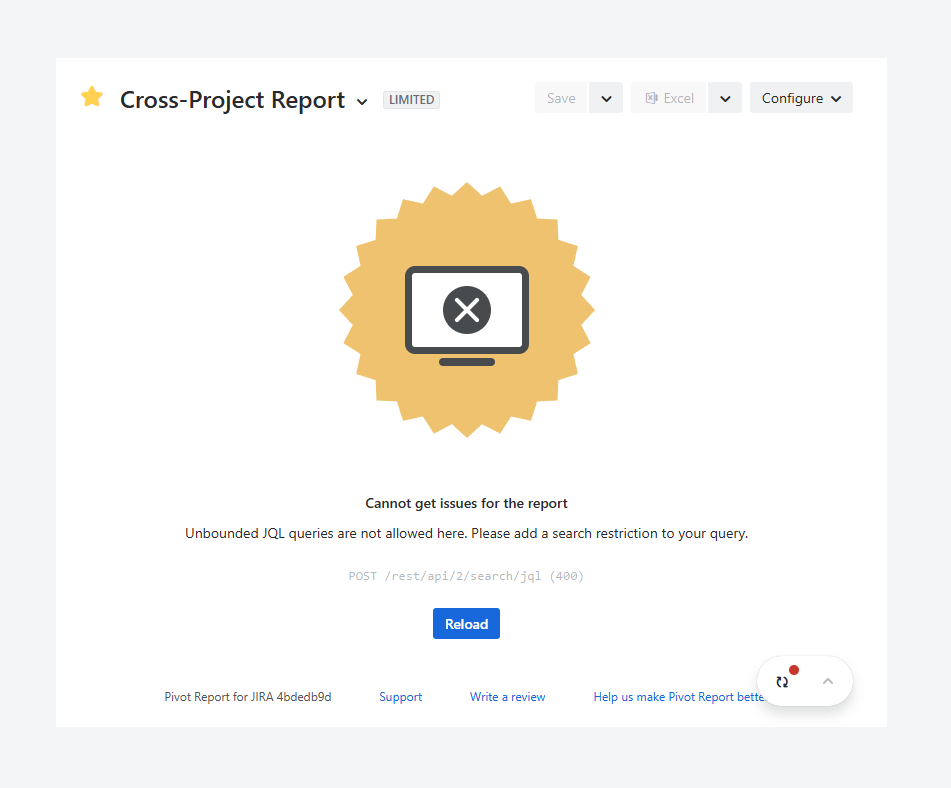
The error above appears when the report source is unbound, whether it uses a saved filter or a JQL query. Follow the steps in the related article to resolve it.
Why is the JQL query underlined in red?
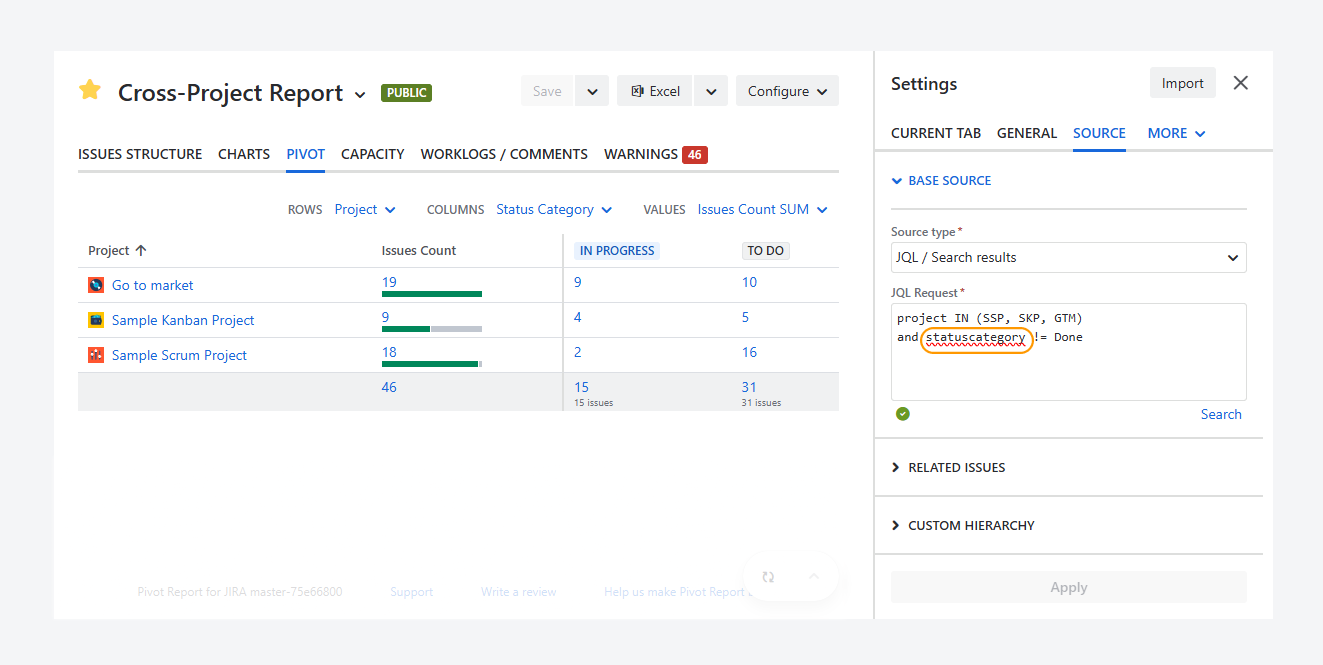
The screenshot above shows the statuscategory field underlined in red in the query entered in the JQL Request. However, the query is valid, as indicated by the green checkmark below the JQL Request.
The field is underlined because your browser's spell check does not recognize statuscategory as a correctly spelled word. You can prevent the field from being underlined by turning off spell check in your browser.
The following steps show how to turn spell check on or off in Chrome:
-
On your computer, open Chrome.
-
Click More > Settings > Languages.
-
Under Spell check, turn Check for spelling errors when you type text on web pages on or off.
If you turn off spell check, Chrome will no longer check for spelling errors when you enter text into input fields on any website, not just Jira.
If you have questions or need assistance, contact our support team via email or service desk. Our team is available Monday through Friday (9:00 AM to 7:00 PM GMT+7) to help with technical challenges or discuss improvements.