
This article explains the different sharing types and when to use them.
If you need to locate a report before changing its sharing type, see the related article.
Why should you share reports?
When you save a new report or create a copy of an existing one, it is assigned a unique URL that remains the same even after the report is updated, as long as you save your changes.
You can share this URL with clients as a deliverable, with collaborators as a living document for monitoring a project, or keep it for your own reference. After identifying the report's intended audience, you can define who can view, edit, or share it.
For example, collaborators can edit the report if they are assigned as report admins. For clients, you can restrict permissions so that only designated users can modify or share the report.
Features and use cases
How can you access Sharing settings?
A report admin, the report owner, or a Jira admin can change sharing settings, including the report’s sharing type and who has access. These settings can be updated on the Manage Pivot Reports page or within the report itself.
Manage Pivot Reports page
To change Sharing Settings from the Manage Pivot Reports page:
-
Click the actions (•••) menu next to the report.
-
Select Sharing from the dropdown.
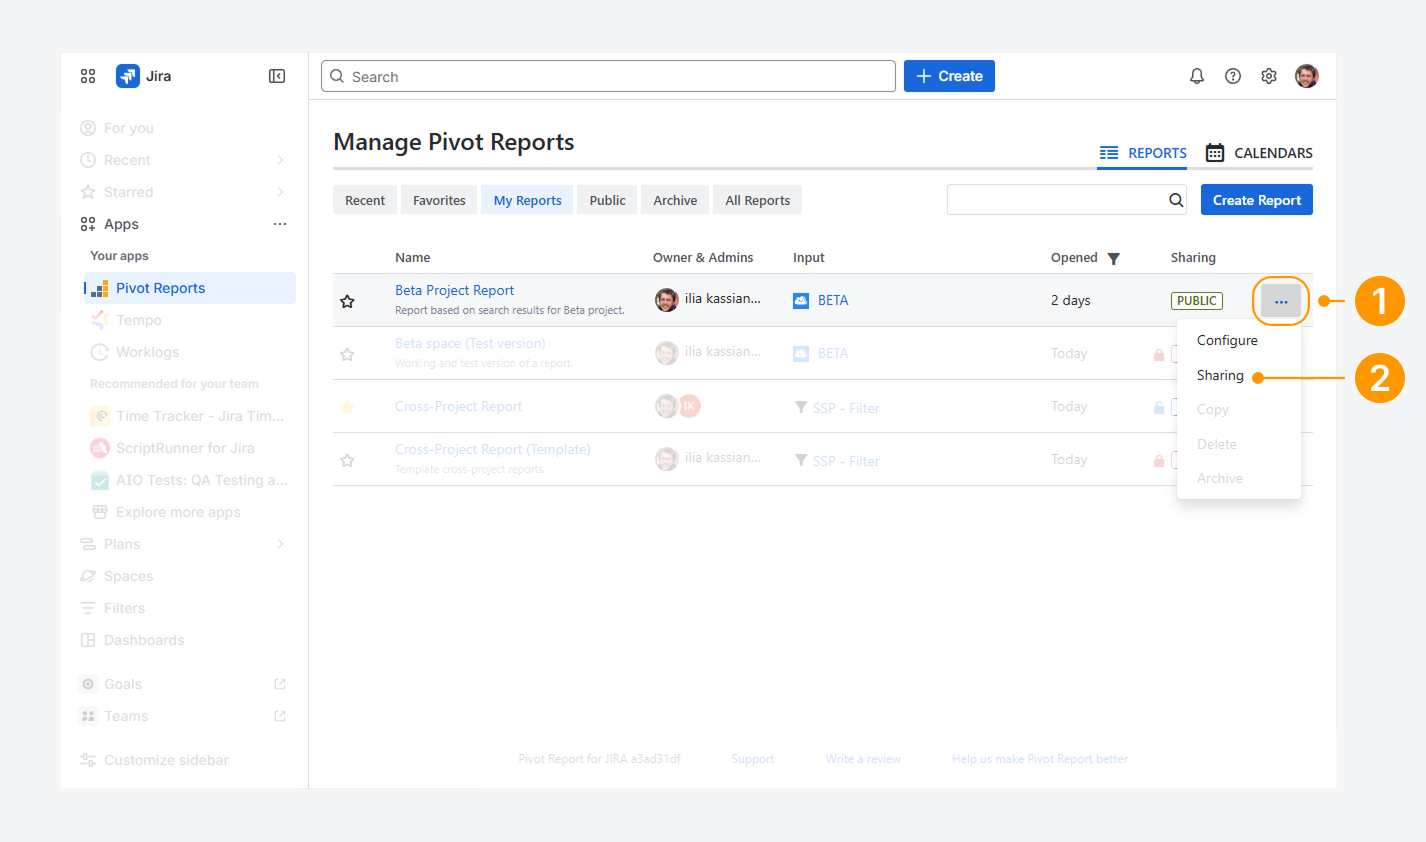
Alternatively, you can click the label in the Sharing column to open the pop-up directly.
-20260305-193726.png?cb=9667b2e36926c007338924e39db6b6b5)
-
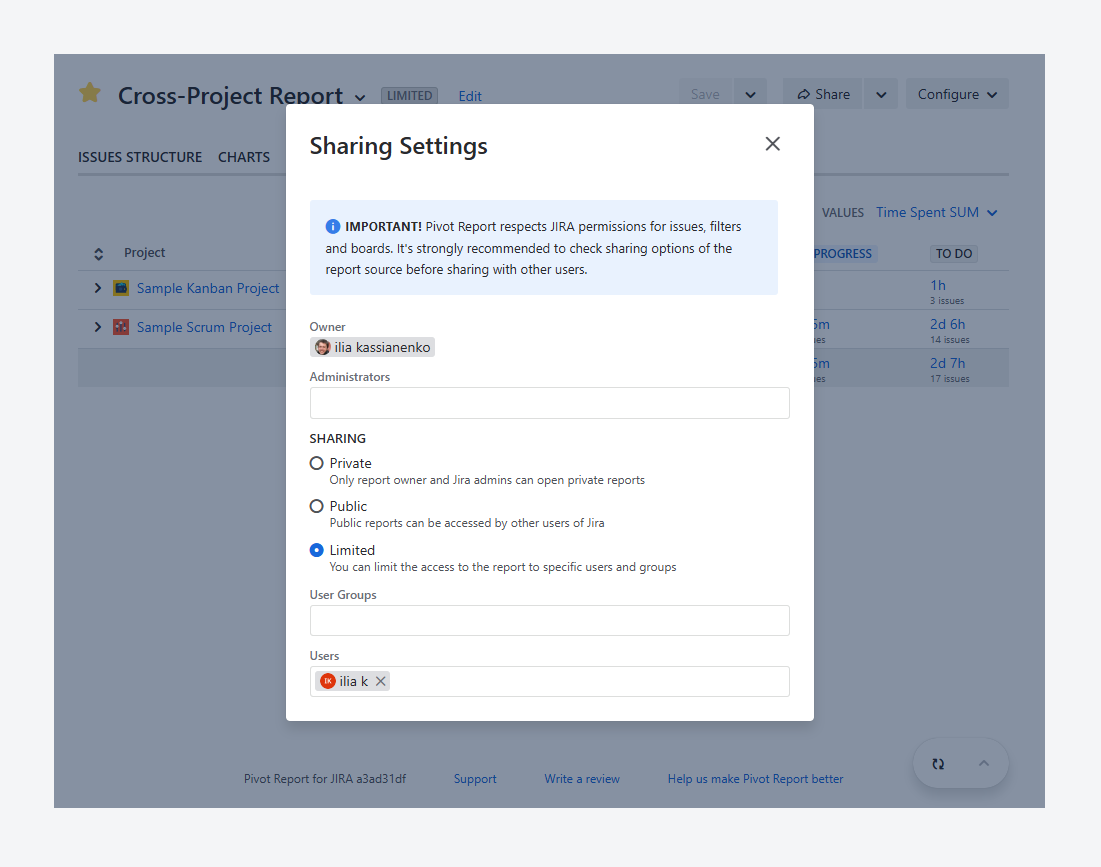
In the Sharing Settings pop-up, add or remove users as report admins. Also, change the Sharing type to Private, Public, or Limited.
-20260305-193837.png?cb=324eafcc2704393318f7b7f04109369b)
Inside the report
To change Sharing Settings from within a report:
-
Click Configure in the report header section.
-
Select Sharing from the dropdown menu, which open the Sharing Settings pop.
-20260228-224746.png?cb=9a74a0cd91bbf430103d2a61974520f6)
Alternatively, click the Sharing type label below the report title to open the pop-up.
-20260228-225126.png?cb=11be7b1650f19f1c0b90806d81273539)
-
In the Sharing Settings pop-up, add or remove users as report admins. Also, you can change the Sharing type to Private, Public, or Limited.
Why and how should you grant report admin access?
After a report is saved, you can grant admin access to users—regardless of its sharing type. Report admins can update the report’s data source, edit content across all tabs, and manage other admins. They can also change the report’s sharing settings.
To add or remove report admins follow these steps:
-
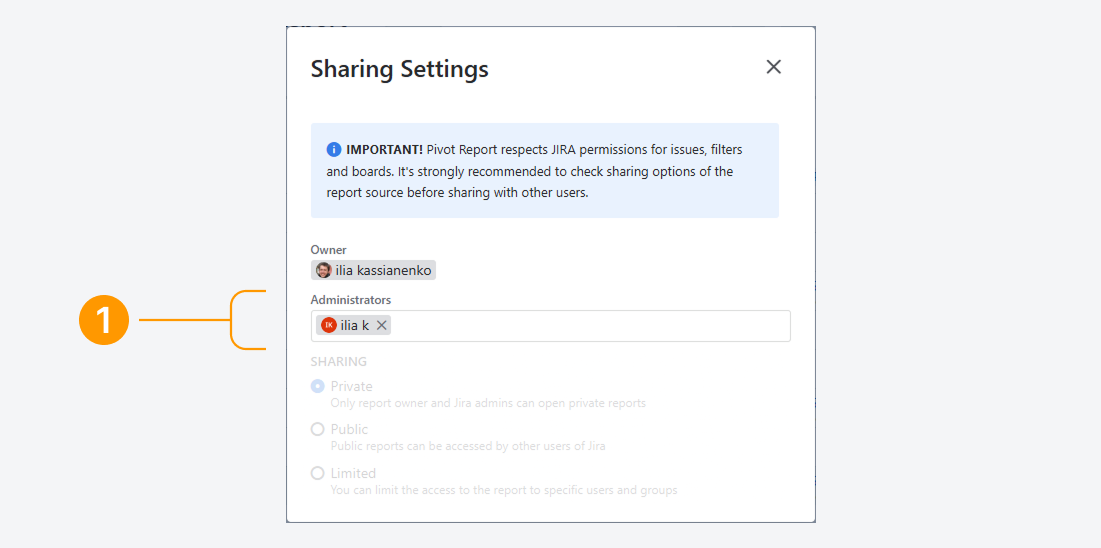
Review the current entries in the Administrators fields. To remove a user, click the 'X' icon next to their name.
-
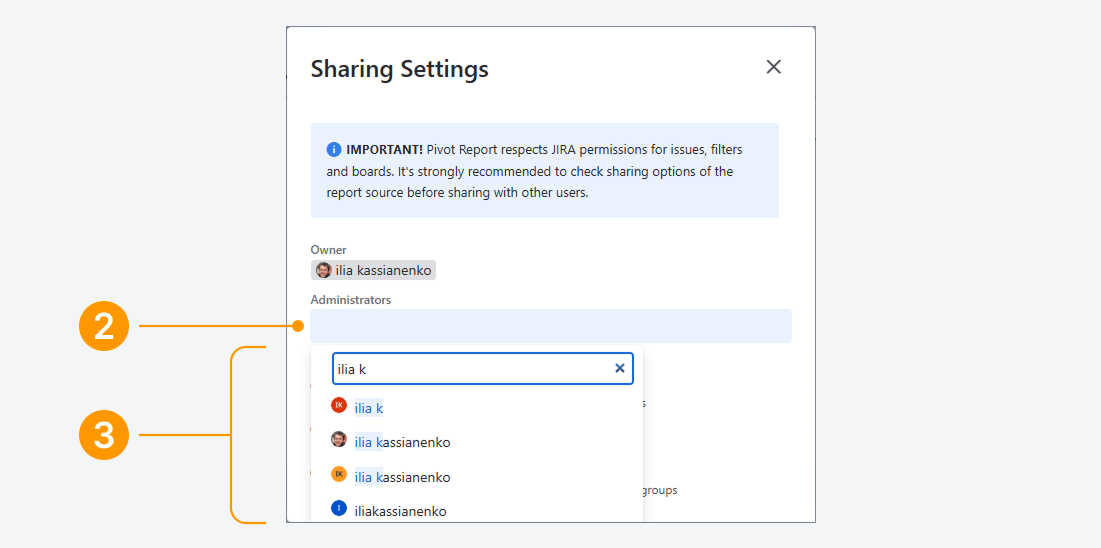
To add a user, click inside the Administrators field to open the search prompt.
-
You can use the search box or select from recent results. Only active users will appear.
The report owner or an admin can remove another admin using the Sharing Settings pop-up. However, admins cannot transfer report ownership to another user. Only a Jira admin can perform this action.
What Sharing types can you use?
Each saved report has a Sharing type that controls who can access it. You can change the sharing type at any time.
There are three types:
-
Private (default): Only the report owner and Jira admins can view the report. Other users cannot see it.
-
Public: Any user with access to Pivot Report in your Jira instance can view the report.
-
Limited Access: Only the users or user groups listed in the Sharing settings can view the report.
Private reports
When you create a report, it is set to Private by default. This means only you and Jira admins can access it.
You can choose to give admin access to collaborators, which lets them update the report's source or layout.
If you want some collaborators to view the report without editing it, you can switch the sharing type to Limited Access.
Public reports
By default, once Pivot Report is installed, Public reports are visible to all users and groups in your Jira instance. Any user who has access to a report’s source—such as a Jira project—can view Public reports in their entirety.
How can you verify access to Public reports?
To verify access to these reports, follow these steps:
-
From Jira’s sidebar, open Apps and select Pivot Reports.
-
On the Manage Pivot Reports page, select the Public filter. This displays all reports shared publicly.
-
Review the list for reports where you are not listed as the owner or an admin. If you can open these reports, Public access is working as expected.
In the example below, only Public reports where you are the owner or admin are shown.
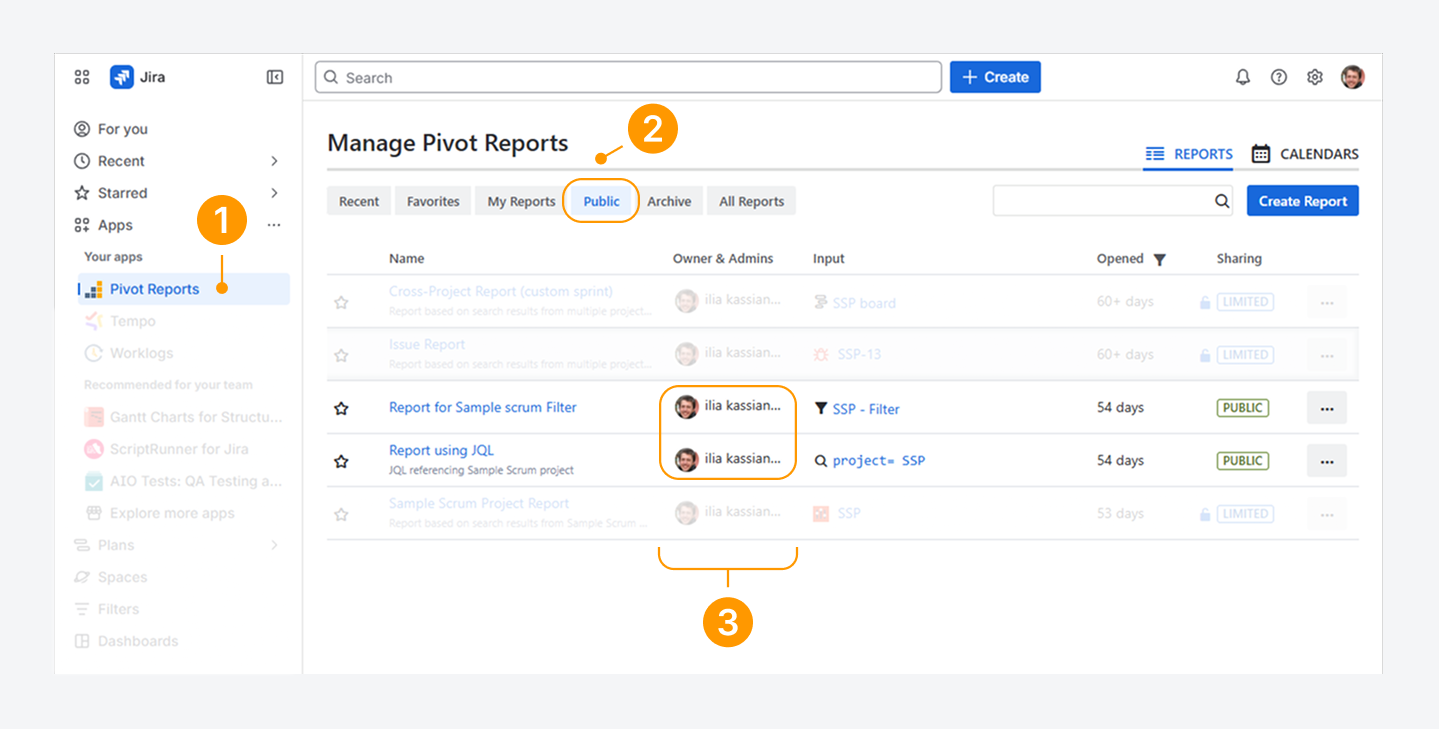
If Public reports are missing, your user group or permissions may be restricted at the app level.
To request access, contact a Jira admin and ask them to enable Pivot Report in the app-level settings, as detailed in a separate article.
When should you limit access to Public reports?
You may want to restrict who can view Public reports—especially external users, such as customers.
For example, even if a customer doesn’t have access to a project, they can still see the report title and work item source from the Manage Pivot Reports page.
If the customer does have access to both the project and the Public report, they may gain unintended insight into your organization.
For more information on managing Jira users outside your organization, refer to Atlassian’s documentation.
Limited access
You can give specific users or user groups access to private reports without making them report admins or owners. This is only possible when the report uses the ‘Limited’ sharing type.
When should Limited access sharing be used?
Use the 'Limited access' sharing type when a report should be visible only to specific users or groups—such as a single recipient and their team lead, or when tracking sensitive metrics for a department or external users like customers.
For example, you may have created a private report that tracks customer churn based on account closure tickets in Jira. You want to share this report—including the Charts tab and other metrics—with managers and directors. One option is to send HTML snapshots or duplicate the report and transfer ownership. However, recipients won’t see any updates unless you send a new version each time.
Instead, by granting Limited access to the original report, these users or groups can view and interact with all content—including new tabs and updated metrics—without needing repeated copies.
How can you add or remove access?
To add or remove users or user groups from a limited report, follow these steps in the Sharing settings pop-up:
-
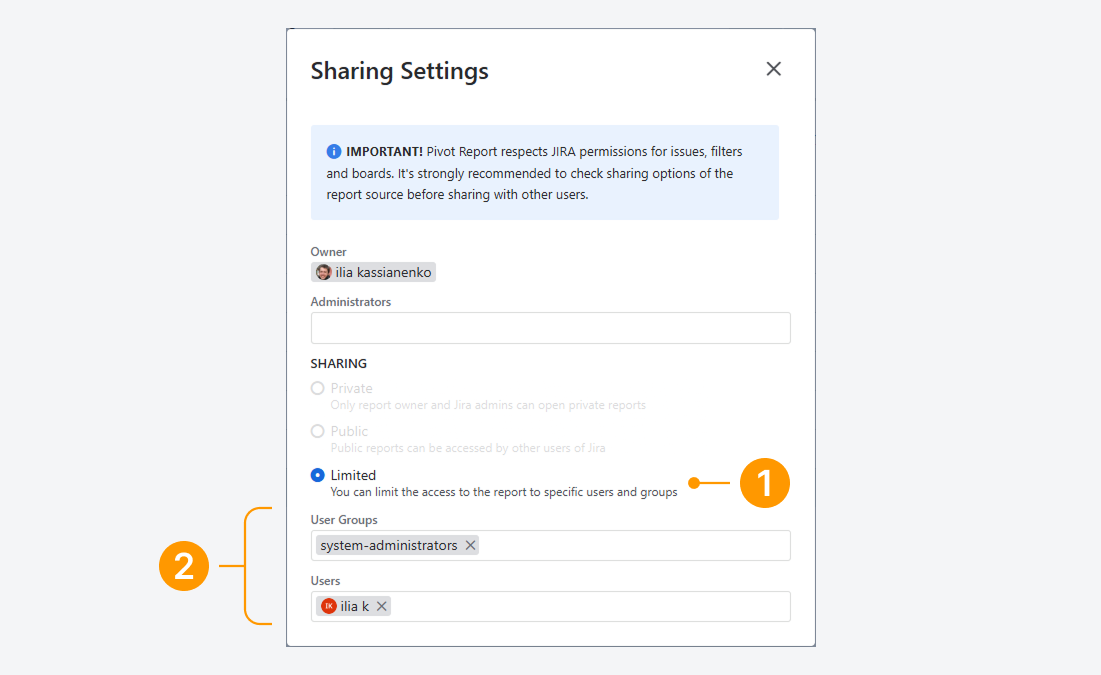
Verify that the Sharing type is set to Limited access. This setting allows you to control which users or user groups can access the report.
-
Review the current entries in the Users and User Groups fields. To remove a user or group, click the 'X' icon next to their name.
-
Click inside the Users or User Groups field to open the search prompt. The Users field lists all active users, and the User Groups field shows all available groups in your Jira instance.
-
Use the search box or select from recent results to add a user or group.
-20260305-194110.png?cb=2ac4c2aa7307acd7dda4e469a2ddff6c)
If a report is set to Limited Access but no users or user groups are selected, the sharing type will automatically switch to Public when the Sharing settings are saved.
FAQ
Can you use Pivot Report to access locked Jira content?
No. Pivot Report cannot access data you do not have permission to view. The app inherits permissions from Jira and any third-party applications, with no option to override them.
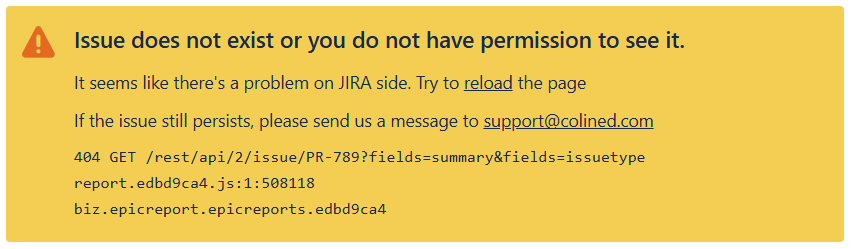
For example, if a user tries to open a report that includes work items from a space they don’t have access to, an error message will appear, as shown in the above screenshot.
Verify that you can access the relevant work items, filters, boards, and space when working with a report that references them, by following the steps in a related article.
Can you restrict access to Public reports for specific spaces or projects?
No, Public reports cannot be restricted on a space basis.
However, user permissions in Jira can be limited for a space, and this may affect access to reports that use that space as a source.
If you open a Public report from the Manage Pivot Reports page and the report is linked to a source you are not allowed to access, the report will display an error message.
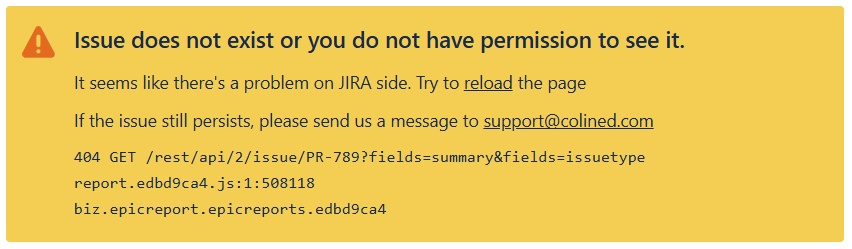
If you think you may not have access to a Public report, see the related article for guidance.
What happens when you try to open a report for which you don't have sufficient permissions?
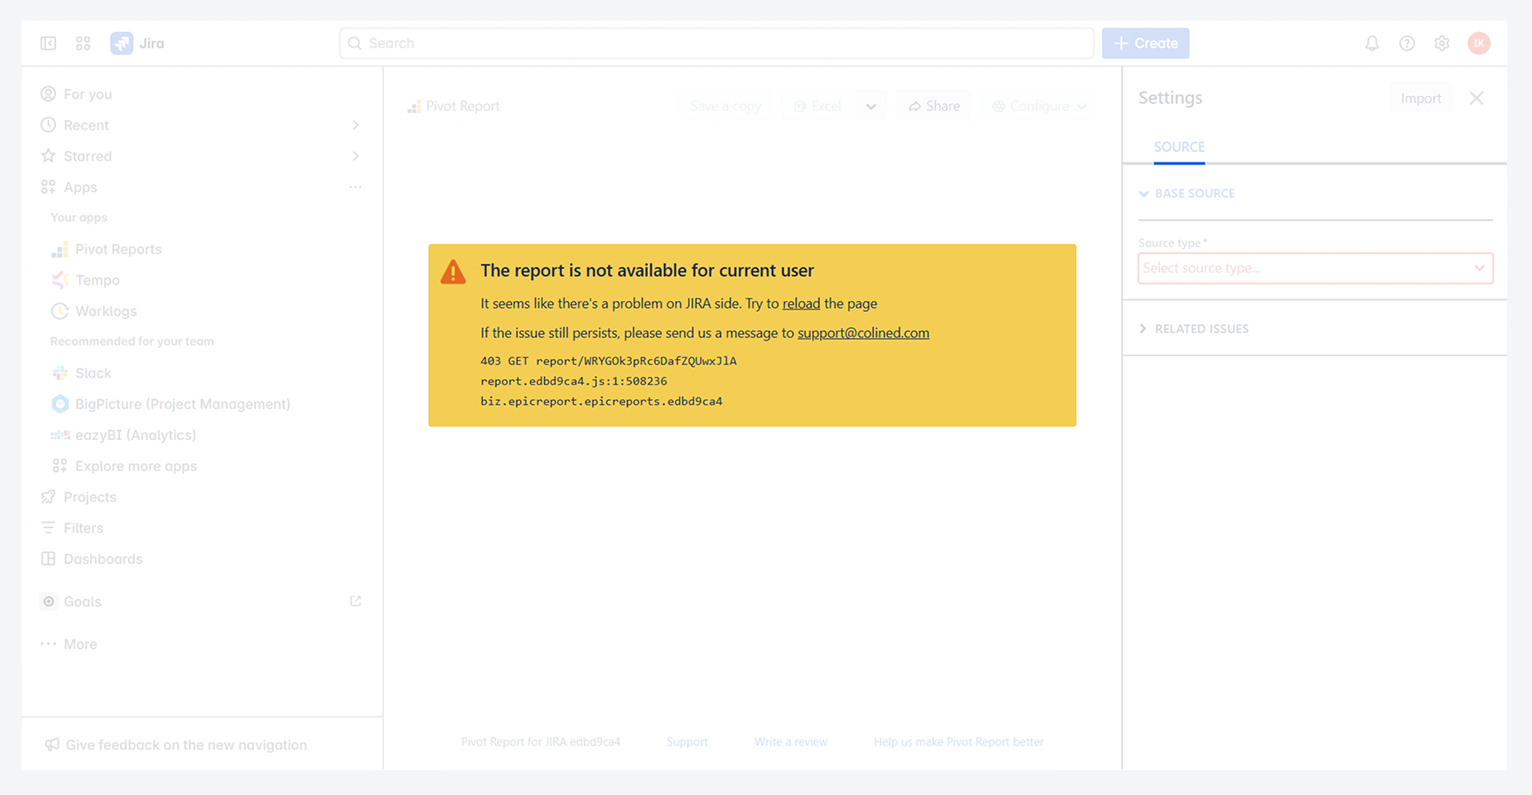
If you try to open a private or limited report, or a report whose source you cannot access, the errors shown in the screenshots above will appear. Follow the steps in the related articles to restore access to the report or its source.
What permissions affect report access beyond Sharing setting?
Pivot Report follows all permissions set in your Jira instance and any third-party app restrictions. It cannot override these settings. For example, you may have permission to open a report, but if you don’t have access to its source—such as a project, filter, or board—the data will not be visible. Your Jira permissions control what you can see and do in a report.
If your permissions change while you're viewing or editing a report, your access will update in real time. This means you might lose unsaved changes or see the report content update immediately.
Troubleshooting
Can you lose access to a report?
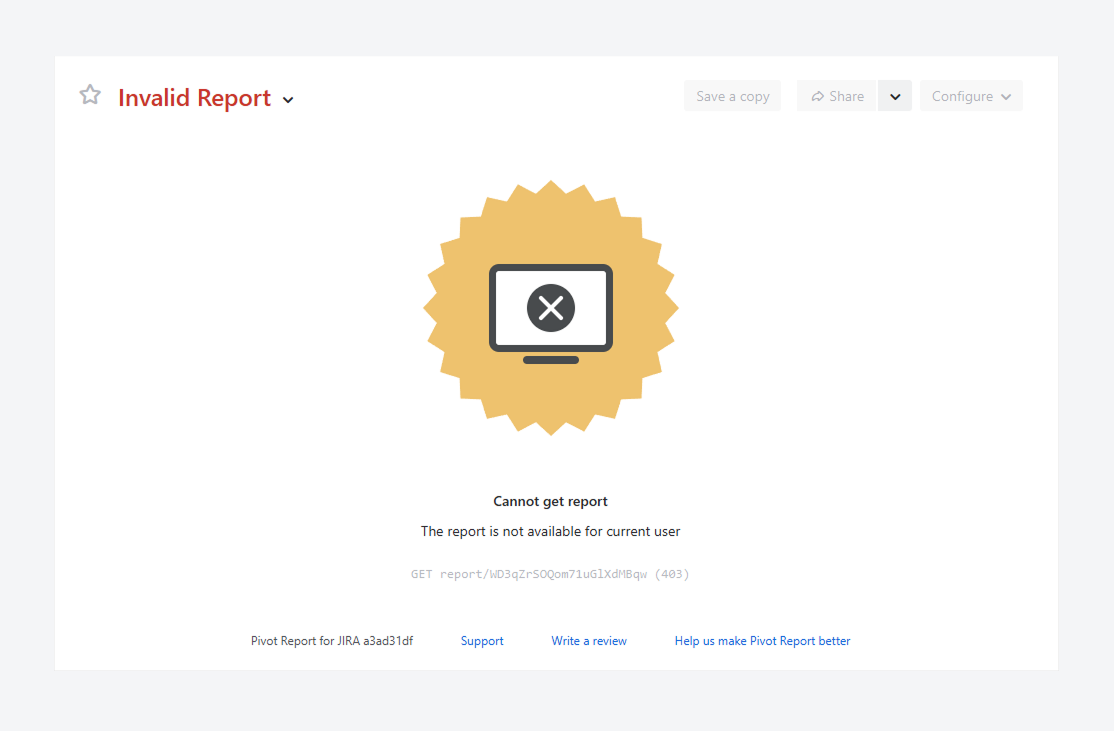
Yes. The error message above appears when you try to open the URL of a report you no longer have permission to view, even if you previously had access.
If another message appears, verify whether you have access to the report source, by following the steps mentioned in a related article. Similarly, if a blank page appear instead of a message, verify if you have access to the app.
Verify whether you have access to the report, by following the steps mentioned in a related article.
Can a signed-out user access a report?
No.
Colined protects your data by not storing it on its servers and by blocking access to the app for signed-out users.
If you are signed out of Jira, you cannot edit reports or use the app’s features, such as the report or calendar list. You can only access exported reports, including Excel files, HTML snapshots, and PDFs.
You also cannot view embedded reports. Even if a Confluence space allows anonymous access, embedded reports display an error message until you sign in to Jira.
How can you tell if you’re logged out of Jira?
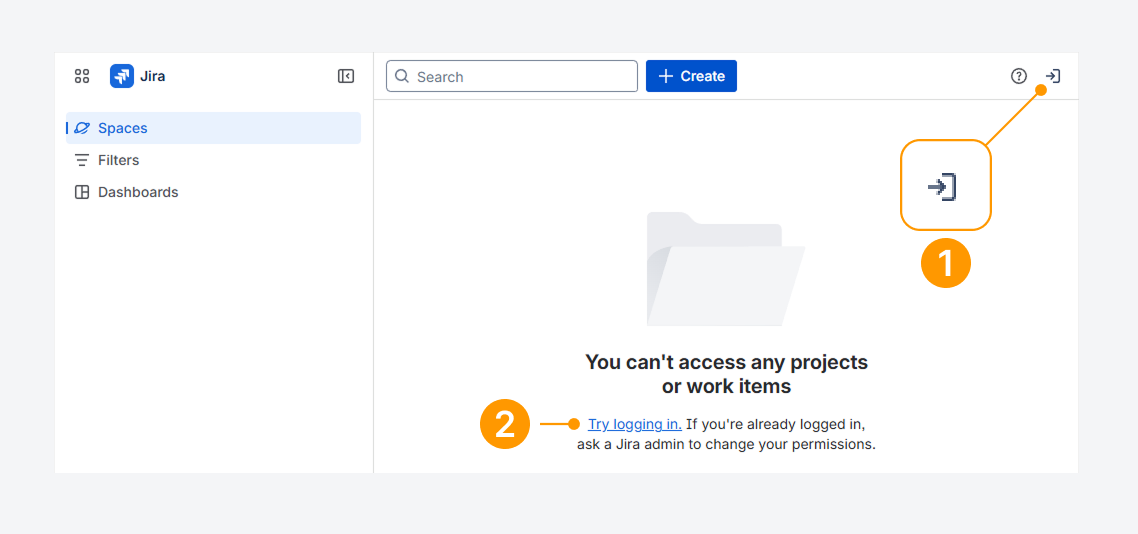
You can tell if you’re logged out of Jira by checking whether:
-
An arrow pointing right is shown the top navigation bar.
-
Spaces, Filters, or Dashboards load as blank pages.
These signs indicate your account is signed out.
Click the arrow or the Try logging in link to log back into your Jira account.
Can you account be logged out due to inactivity?
Yes. Your organization may set an idle session duration, which logs you out automatically after a period of inactivity, as explained in a related Atlassian article.
Also, check your browser’s site data settings, since closing the browser often signs users out.
Will Jira notify you before logging you out?
By default, Jira does not show a warning before ending your session. To change this behavior, see the related Atlassian article.
If you have questions or need assistance, contact our support team via email or service desk. Our team is available Monday through Friday (9:00 AM to 7:00 PM GMT+7) to help with technical challenges or discuss improvements.