
This article explains how to create a report using the app button in Jira’s Issue Navigator. You can create a report from either an unsaved query or a saved filter.
This method is ideal when you need to create a report with a well-defined scope by precisely including or excluding parent, sibling, and child issues from different issue groups.
Features and uses cases
Extend the results of the search query
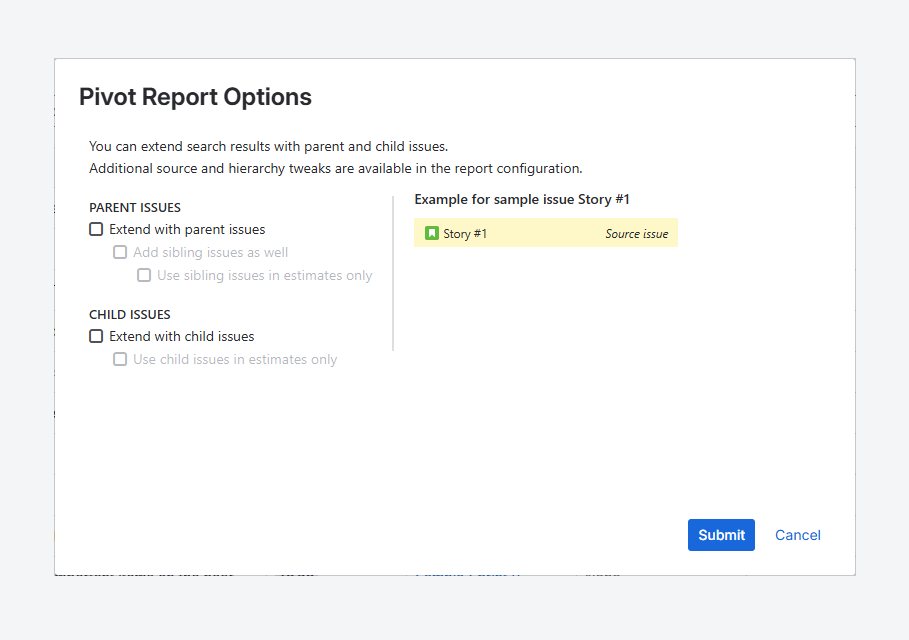
When you create a report using the Issue Navigator, the Pivot Report Options pop-up appears. It allows you to extend the report to include parent and child issues. For more details on these relationships, refer to the related Atlassian article.
Parent issue options
-
Extend with parent issues: Enable this option to include the parent of each issue in the Issue Navigator results. For example, if your results include Stories, this option adds their parent Epics to the report.
-
Add sibling issues as well: Enable this option to include issues that share the same parent. For example, if your results include Stories, this adds other issues under the same Epics, such as additional stories and their sub-tasks.
-
Use sibling issues in estimates only: Enable this option to include sibling values in rollup fields without adding the issues to the report. Rollup fields—such as ∑ Original Estimate, ∑ Time Spent, and ∑ Remaining Estimate—will include values from sibling issues. For example, Epic-level totals will include estimates from all related issues.
Child issue options
-
Extend with child issues: Enable this option to include child issues for each item in the Issue Navigator results. For example, if your results include Stories, this adds their sub-tasks to the report.
-
Use child issues in estimates only: Enable this option to include child issues values in rollup fields without adding the issuesto the report. For example, Story-level totals will include estimates from sub-tasks.
How can you use a query to create a report?
Any logged-in Jira user with access to the Pivot Report app and an unsaved search query in Issue Navigator can:
-
Export query results to Microsoft Excel or CSV using Jira’s built-in Export menu.
-
Create a report using Pivot Report.
The screenshots below shows how one click in the Issue Navigator lets you customize the issues included and create a report.
-
From Jira’s top navigation bar, open the Issues menu and click Search for issues.
Alternatively, you can also select a saved query (Filter).
-
Create your search query within the Issue Navigator. You can use either Basic or advanced JQL search modes. The screenshot below shows the 'JQL’ mode.
-
Click Pivot Report.
-20250813-145526.png?cb=9bc1d1e3556893fcf68cca2f8e4ad94a)
-
In the Pivot Report Options pop-up, choose whether to extend results with parent work items. In the screenshot below, this option is disabled.
-
You can also choose to extend results with child items. In the screenshot below, this option is disabled.
-
Click Submit to create the report.
-20250813-151116.png?cb=68946d20dbffd7e585d32235c62aea33)
FAQ
What is the report's name and description when using this method?
-20250813-205943.png?cb=28a424827f0c8a36cc7004bcdebad289)
By default, when you create a report in the Issue Navigator:
-
Report name – If you use a saved filter, the report’s name matches the filter name. If you use an unsaved search query, the report is named Custom Search. Until the report is saved, its name remains a hyperlink to the search query in the Issue Navigator.
-
Description – The report description shows whether Parent, Sibling, and Child issues are included, based on the selections in the ‘Pivot Report Options’ pop-up.
-
Tabs included – All tabs are available by default: Issue Structure, Pivot, Charts, Worklogs/Comments, Capacity, and Warnings.
To rename the report, update its description, adjust its scope (e.g. remove Parent or Sibling issues), or add more tabs, first save the report, then use the Sidebar to make changes.
Troubleshooting
How can you switch to Basic or Advanced search?
In the Issue Navigator, you can switch between Basic and Advanced (JQL) search modes.
If Basic mode is selected, click JQL to switch to Advanced mode.
If Advanced (JQL) mode is selected, click Basic to switch back.
On Data Center, the Basic option appears only when ‘JQL’ is selected. On Cloud, both options are visible at all times.
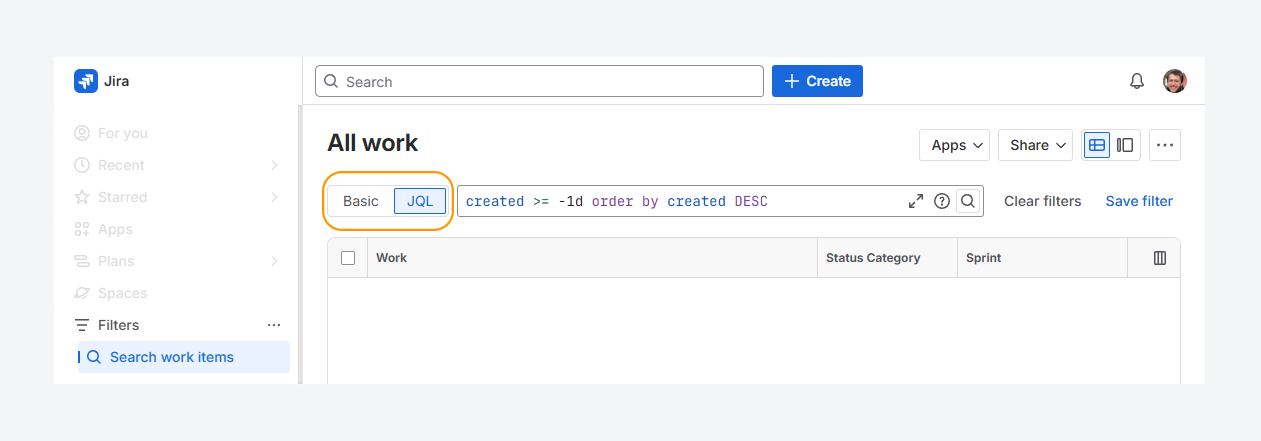
For more details on using Basic / Advanced search for Cloud and Basic / Advanced search for Data Center, refer to Atlassian's documentation.
How can you resolve the unbound queries error when creating a report?
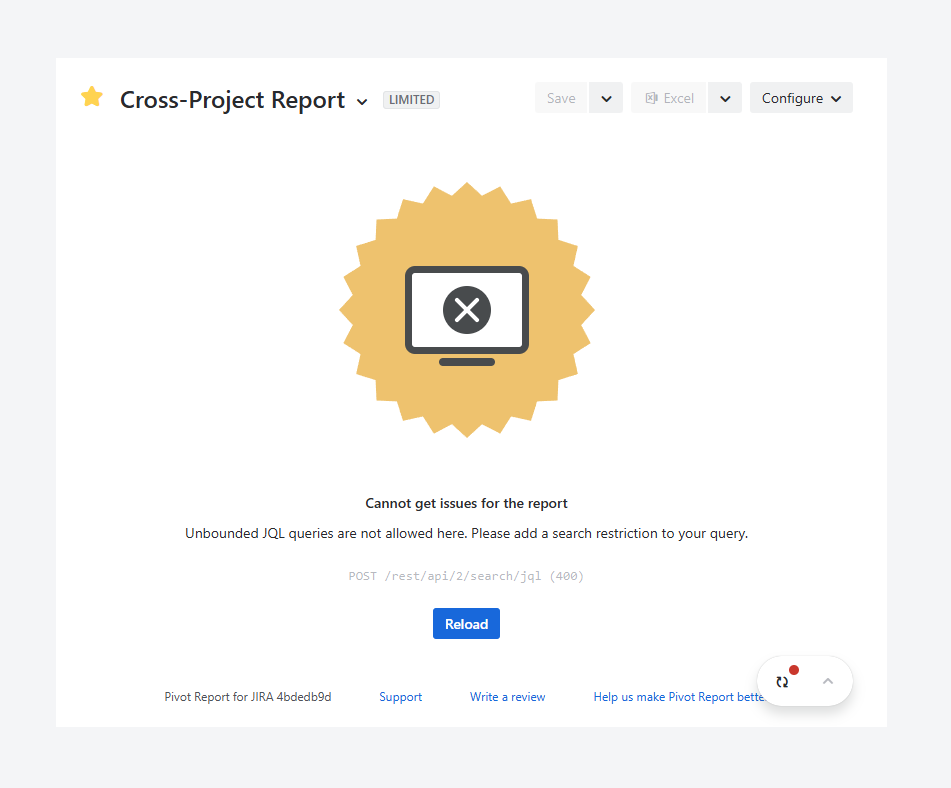
The error above appears when the report source is unbound, whether it uses a saved filter or a JQL query. Follow the steps in the related article to resolve it.
If you have questions or need assistance, contact our support team via email or service desk. Our team is available Monday through Friday (9:00 AM to 7:00 PM GMT+7) to help with technical challenges or discuss improvements.